Uploading trait data to Genesys
This guide walks you through uploading trait data to Genesys, based on the Genesys webinar series. You will prepare your data, make sure it is accurate, and use the web-based tool to get your trait data into Genesys in a searchable format.
Prerequisites
Before you begin, make sure you have everything in place.
Account access
You need login details and permissions to upload data from your account. Genesys has two environments you can use:
- Sandbox (at sandbox.genesys-pgr.org) is a testing environment where you can experiment without affecting your live data. We recommend starting here.
- Production (at www.genesys-pgr.org) is the live portal where your published data becomes publicly accessible.
Excel file preparation
Your Excel file must contain the following minimum passport data columns before you can upload trait data:
- Institute code (INSTCODE)
- Genus name (GENUS)
- Accession number (ACCENUMB)
- DOI numbers (PUID) when applicable
Verifying accessions in Genesys
The accessions listed in your Excel file must already exist in Genesys. If they do not, the upload will not work.
Paste accessions: Select all relevant accession numbers from your Excel file and paste them into the Genesys Accession Number filter to identify any accessions that are not yet recorded in Genesys (figure 1).
Genus name verification: Make sure genus names are listed correctly. Incorrect genus names will cause errors during the upload.
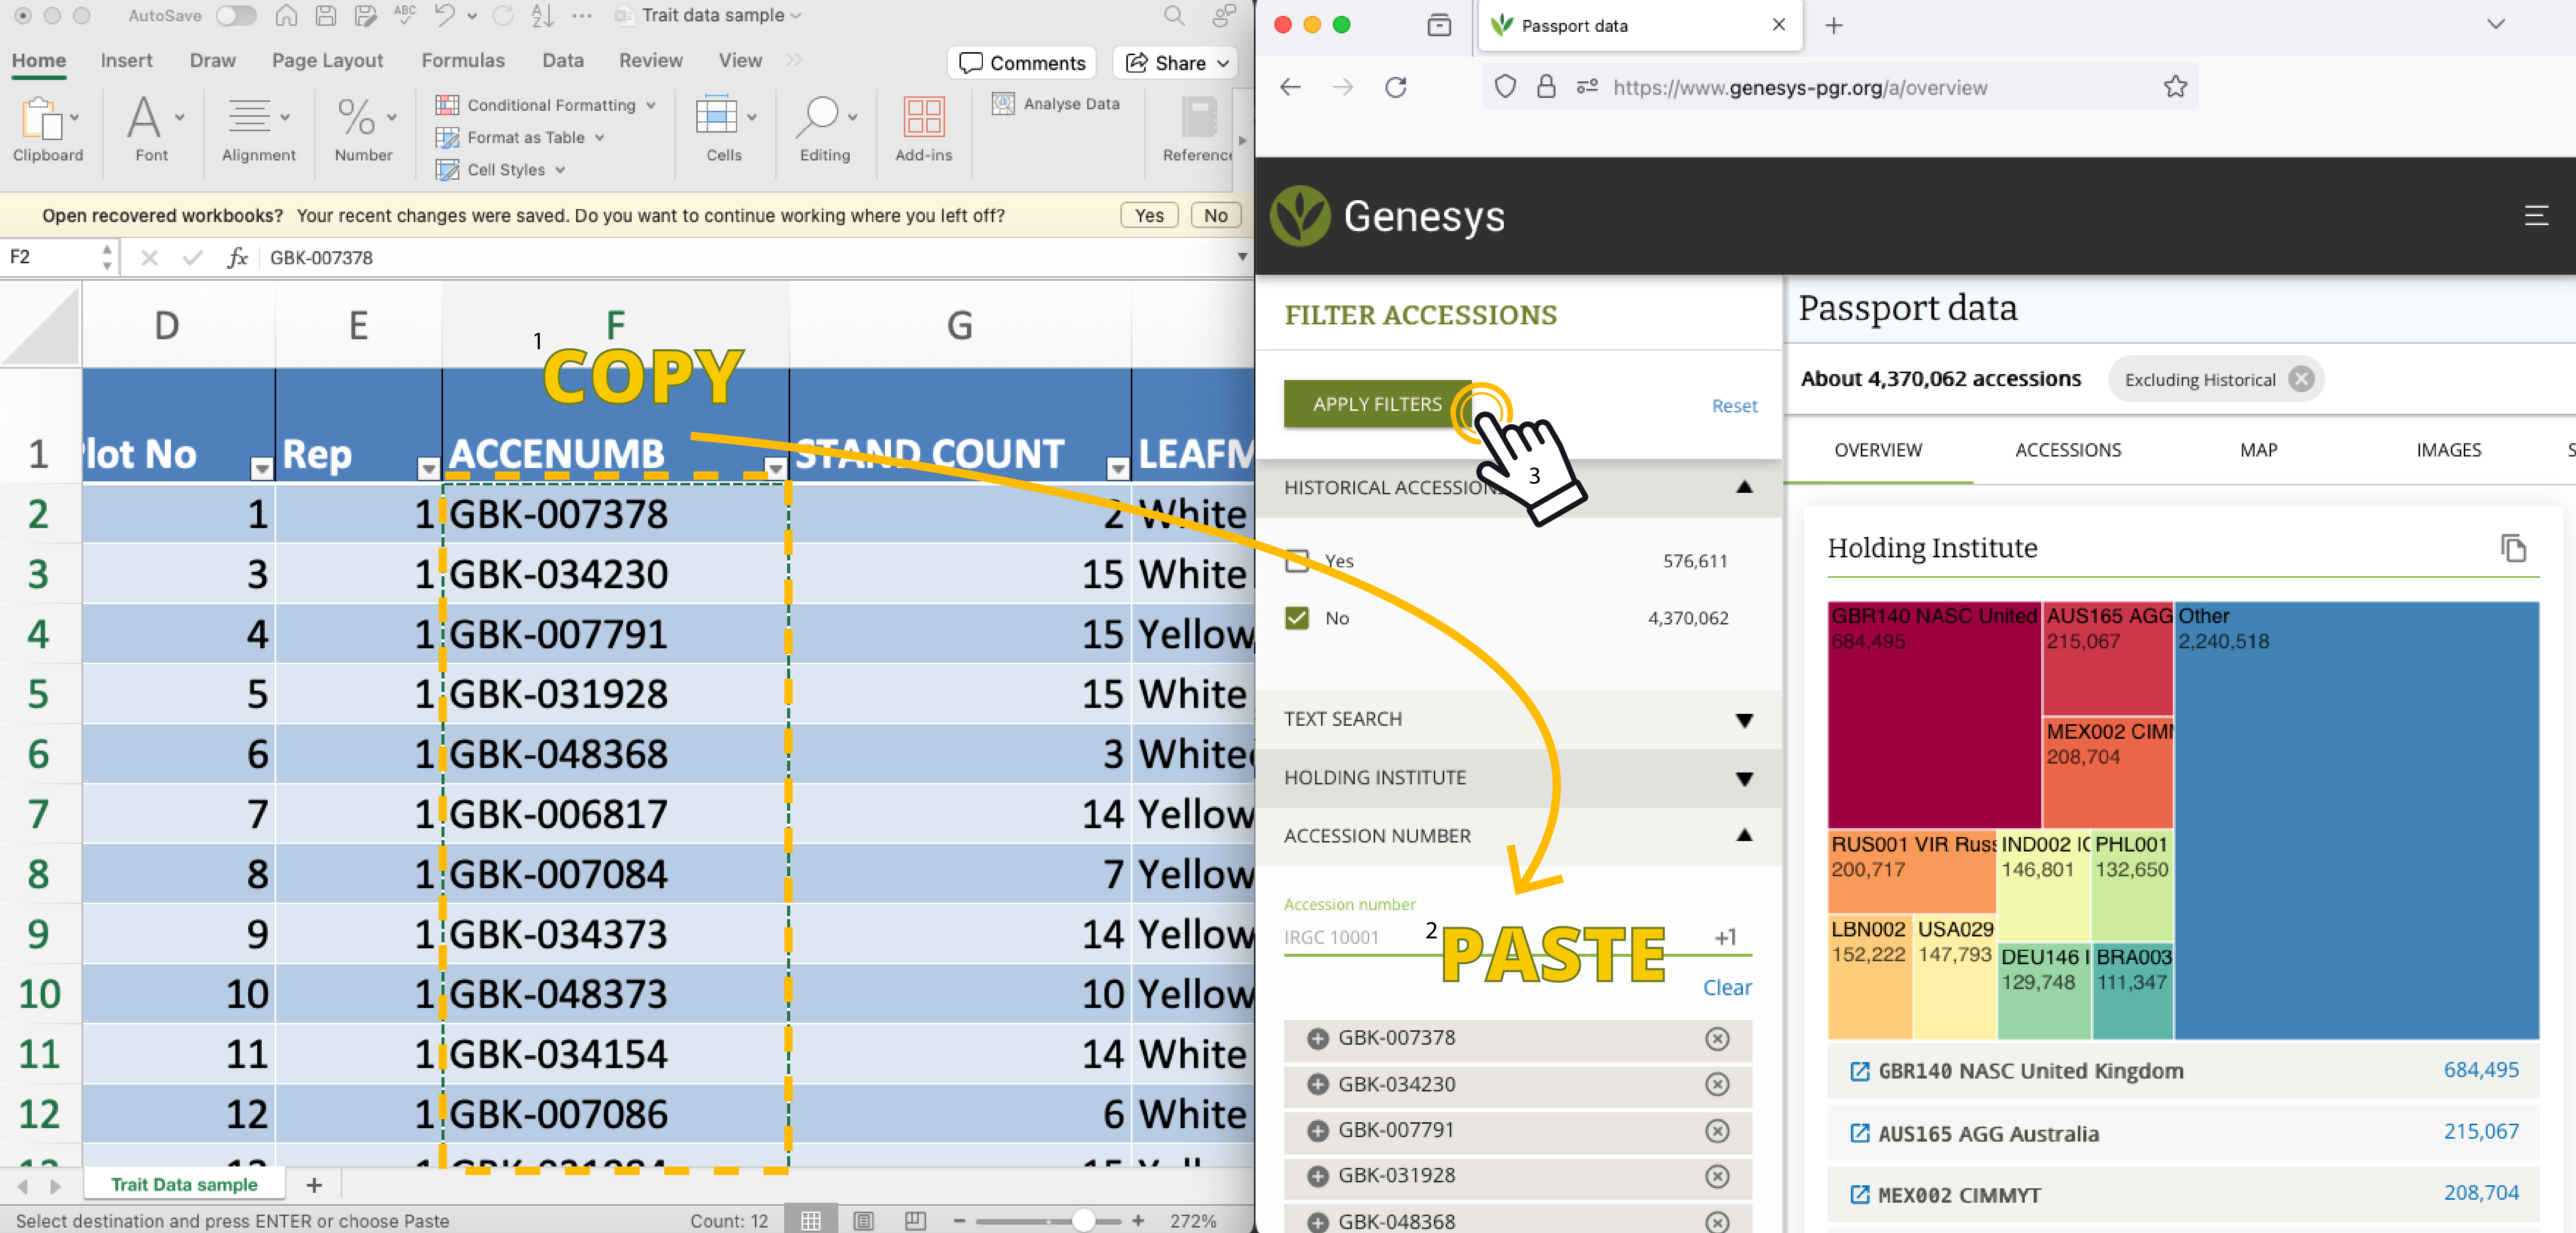 Figure 1: Checking accession passport data
Accessing the dataset uploader
- Log in to Genesys or Sandbox using your credentials.
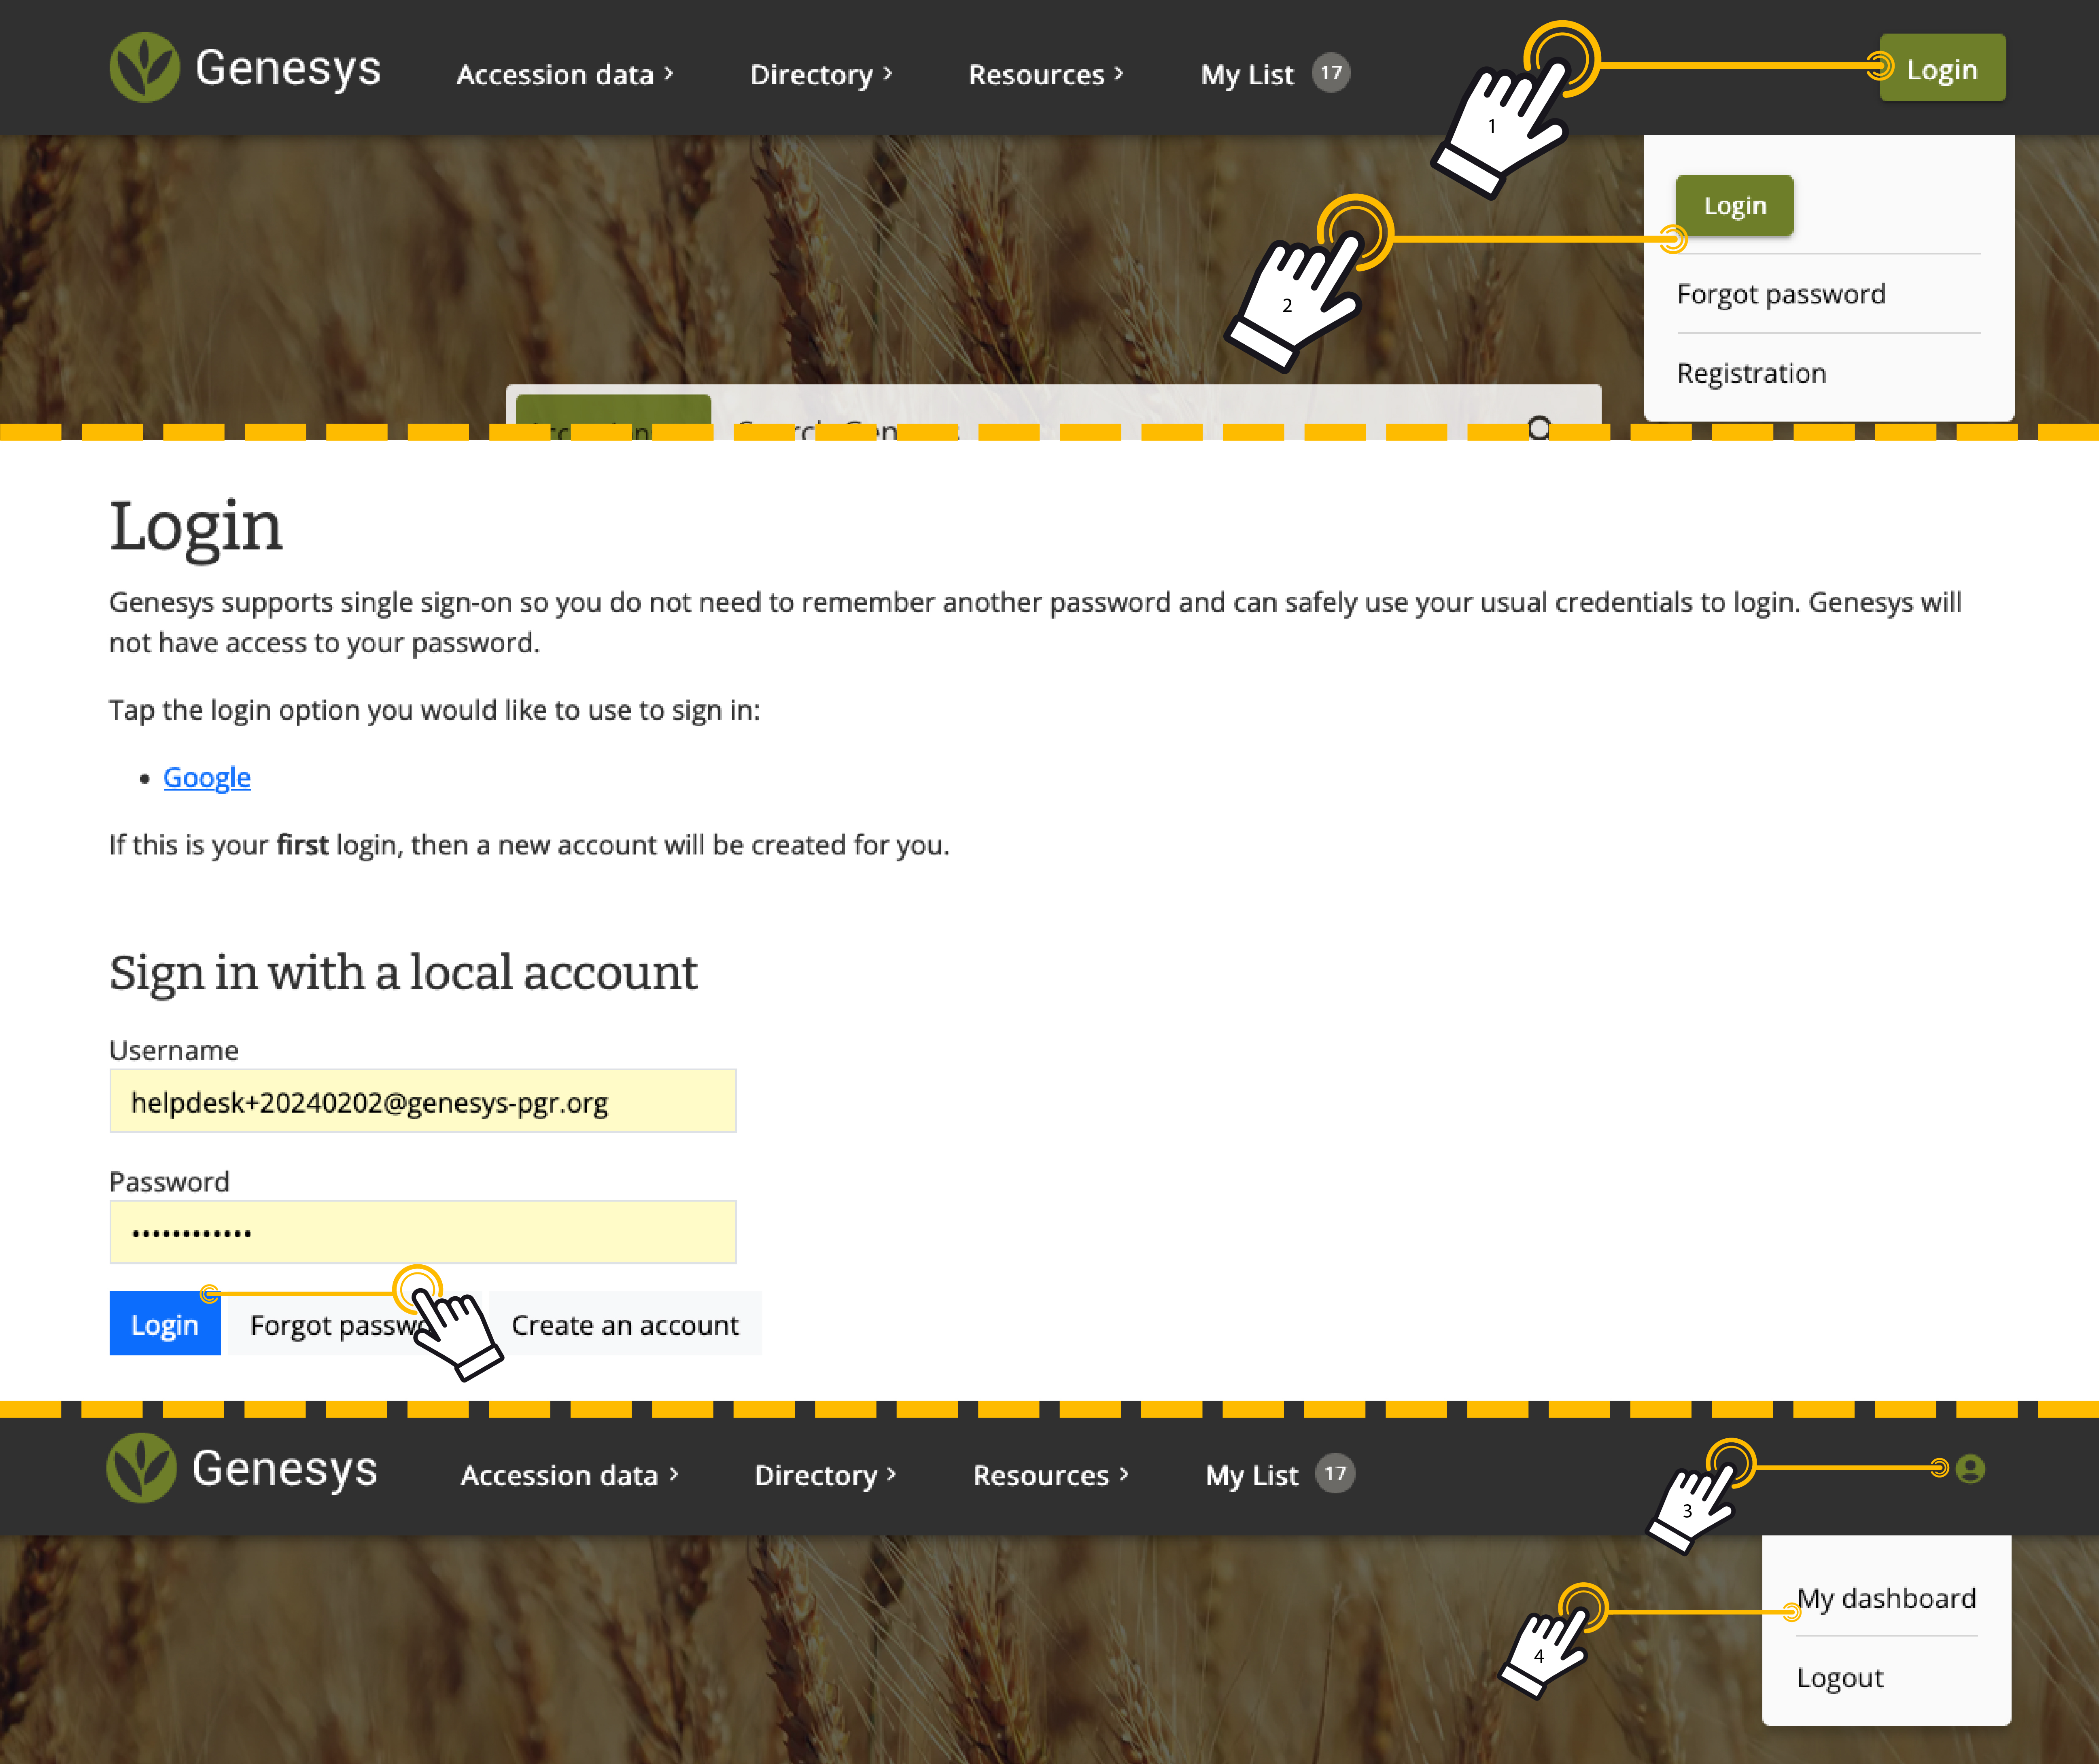 Figure 2: Logging in to Genesys
- Navigate to the dashboard. Locate the "Trait Data" menu and then select "Datasets".
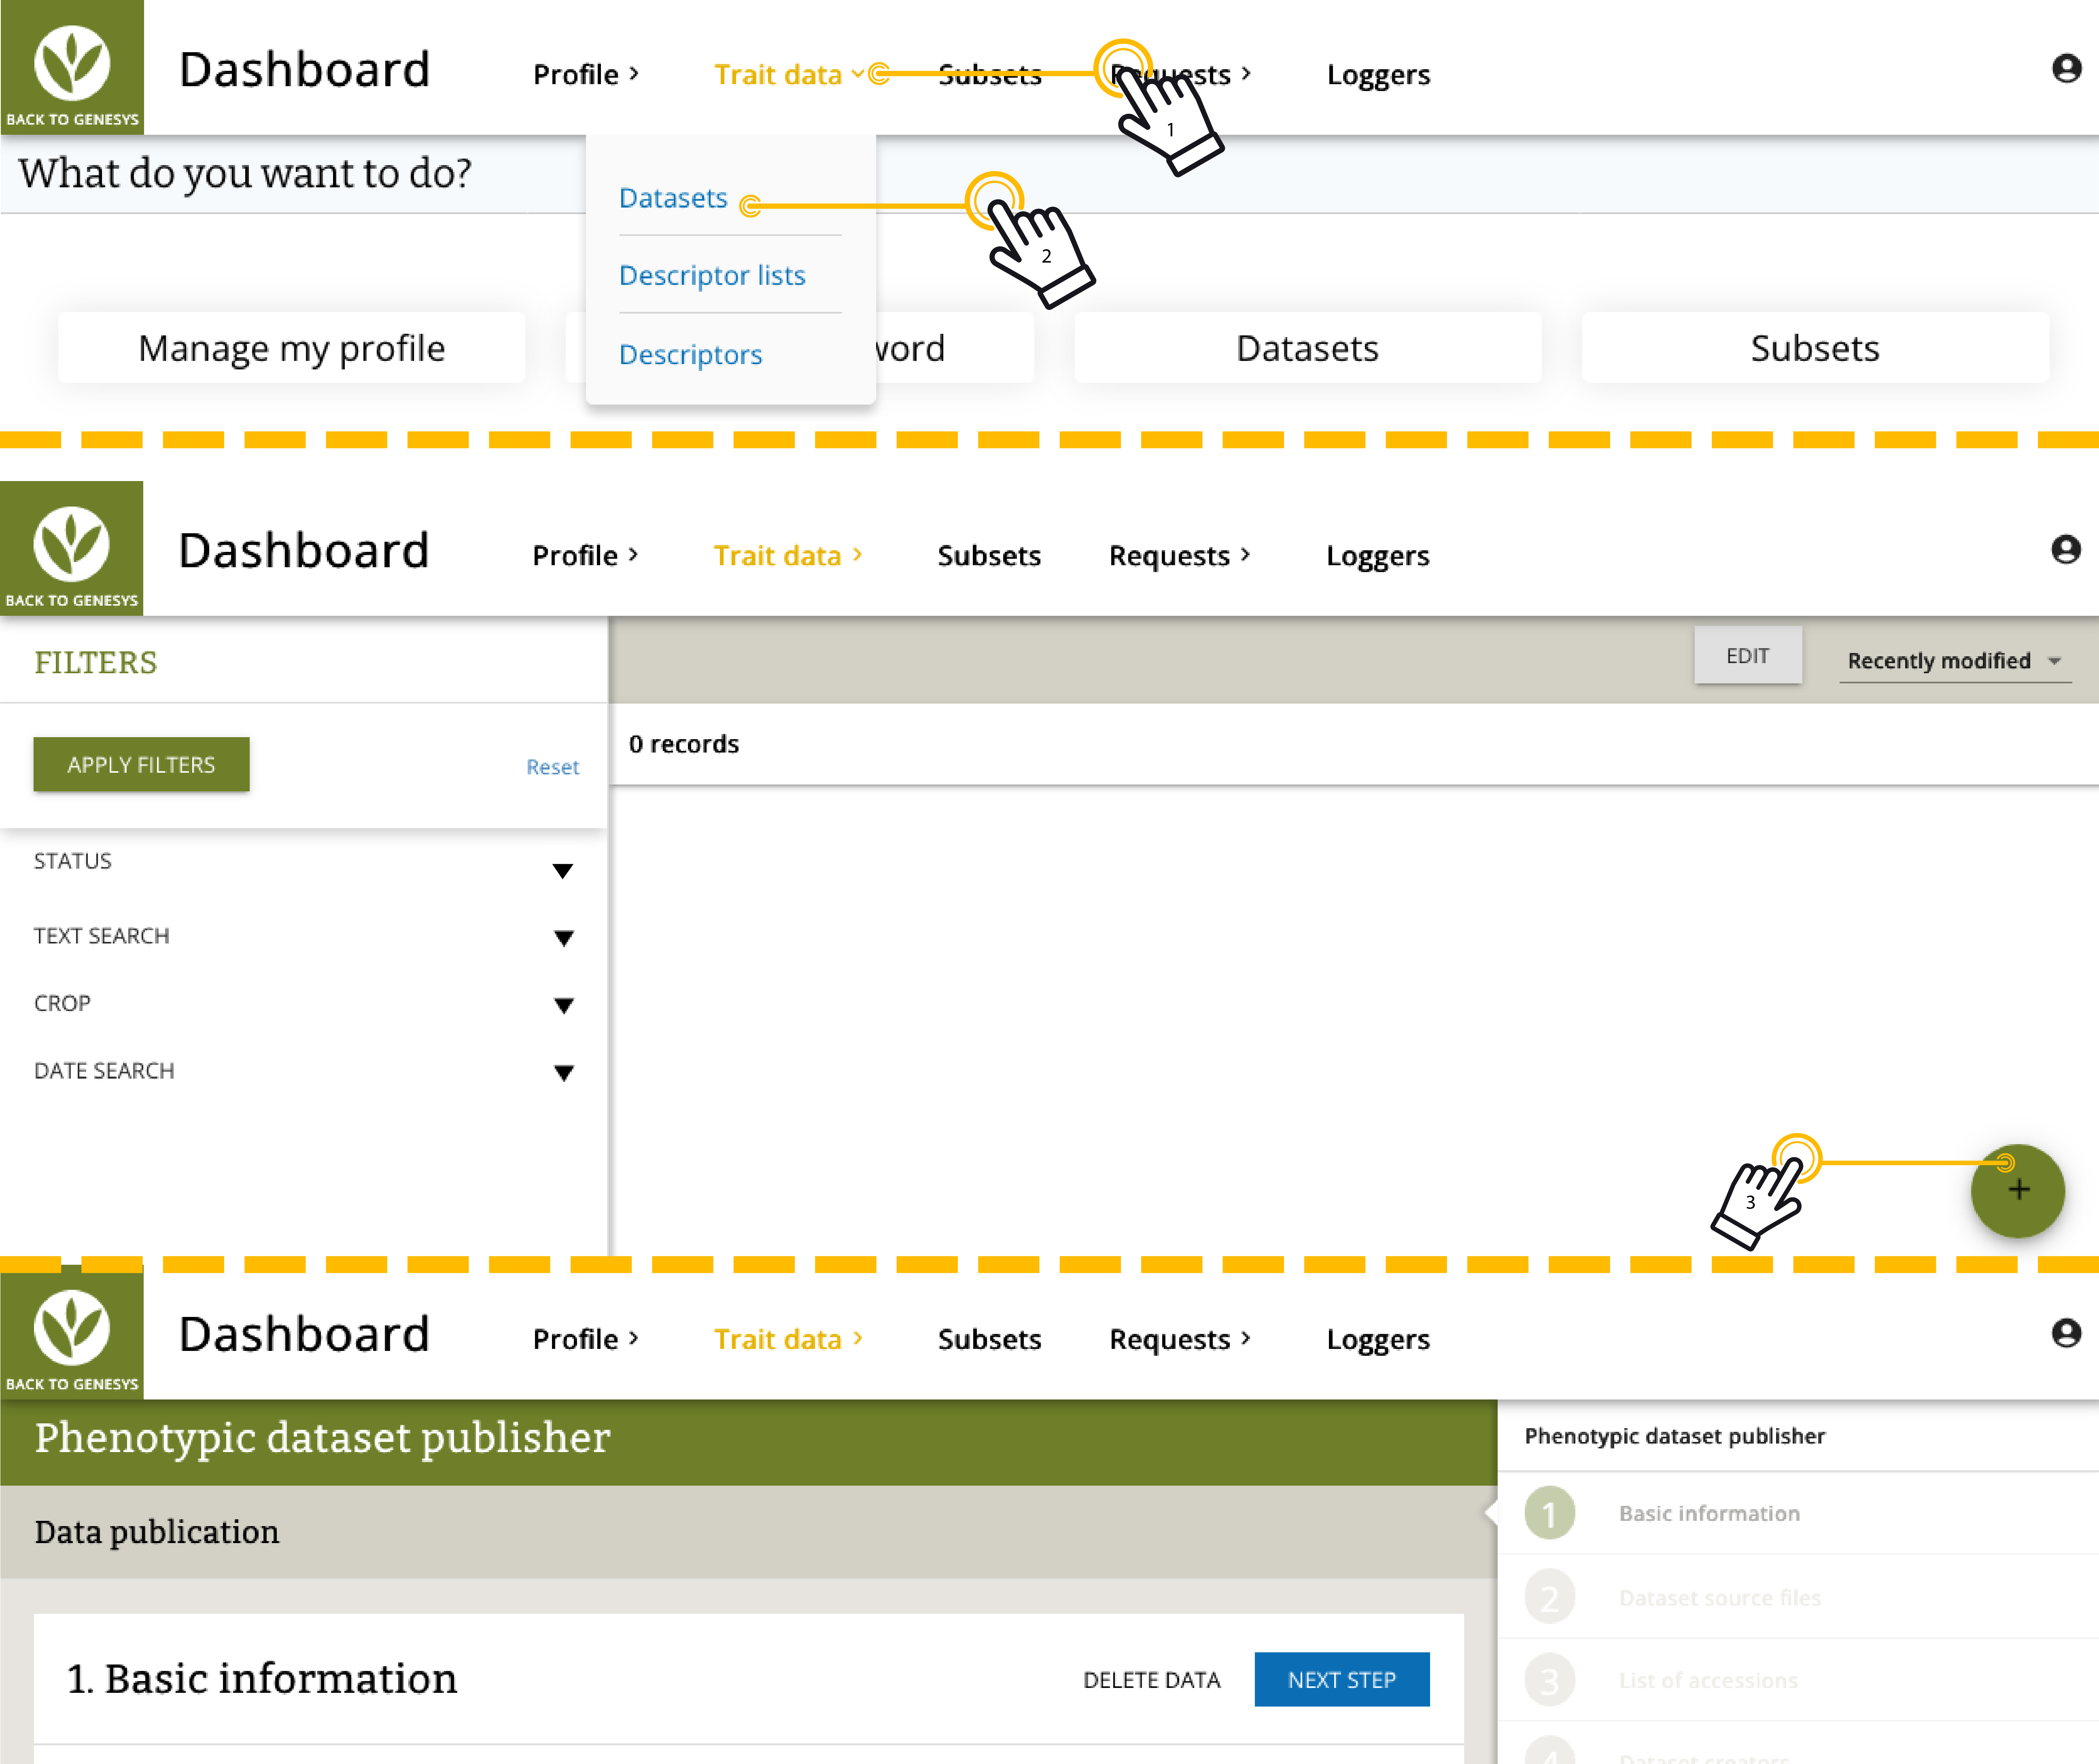 Figure 3: Accessing the trait data uploader
Step 1: Create a dataset in Genesys
Start by creating a dataset to hold your trait data.
- Select Data Provider: Indicate the source or institution providing the dataset.
- Dataset Title: Give your dataset a clear, descriptive name. A good title helps users understand what the dataset contains at a glance.
- Dataset Version: Specify the current version of your dataset. This comes in handy for tracking updates and revisions over time.
- Dataset Description: Describe your dataset here. Basic markdown formatting is supported, so you can make your text clearer and easier to read.
- Date of creation: Enter the date when the dataset was created, in YYYYMMDD format. If the month or day are unknown, replace them with double zeros (for example, 20240600).
- Dataset Rights: Choosing the right licence is important for defining how others can use and cite your data. Genesys PGR supports these Creative Commons licences:
- CC0 Public Domain Dedication: Places your dataset in the public domain, maximising usability. More information
- CC BY 4.0 Attribution 4.0 International: Lets others distribute, remix, adapt, and build upon your data, even commercially, as long as they credit you for the original creation. More information
- CC BY-SA 4.0 Attribution-ShareAlike 4.0 International: Lets others remix, adapt, and build upon your work, even for commercial purposes, as long as they credit you and license their new creations under identical terms. More information
- CC BY-NC 4.0 Attribution-NonCommercial 4.0 International: Lets others remix, tweak, and build upon your work non-commercially. Their new works must acknowledge you and be non-commercial, but they do not have to license their derivative works on the same terms. More information
- CC BY-NC-ND 4.0 Attribution-NonCommercial-NoDerivatives 4.0 International: Lets others download your works and share them with others, as long as they credit you. They cannot change them in any way or use them commercially. More information
- Language: Specify the language or languages of your dataset to help make it accessible on a global scale.
- Source: Include a link to any publication that describes the origin or methodology used to compile the dataset.
- Crops: Select the specific crops featured in your dataset. If you cannot find a crop in the available options, you may skip this field.
Step 2: Upload your Excel file
- Upload: Click "+ Add Dataset File" and upload your prepared Excel file.
- Ingest Data: After uploading, click "Load Trait Data to Genesys" to start the data ingestion process.
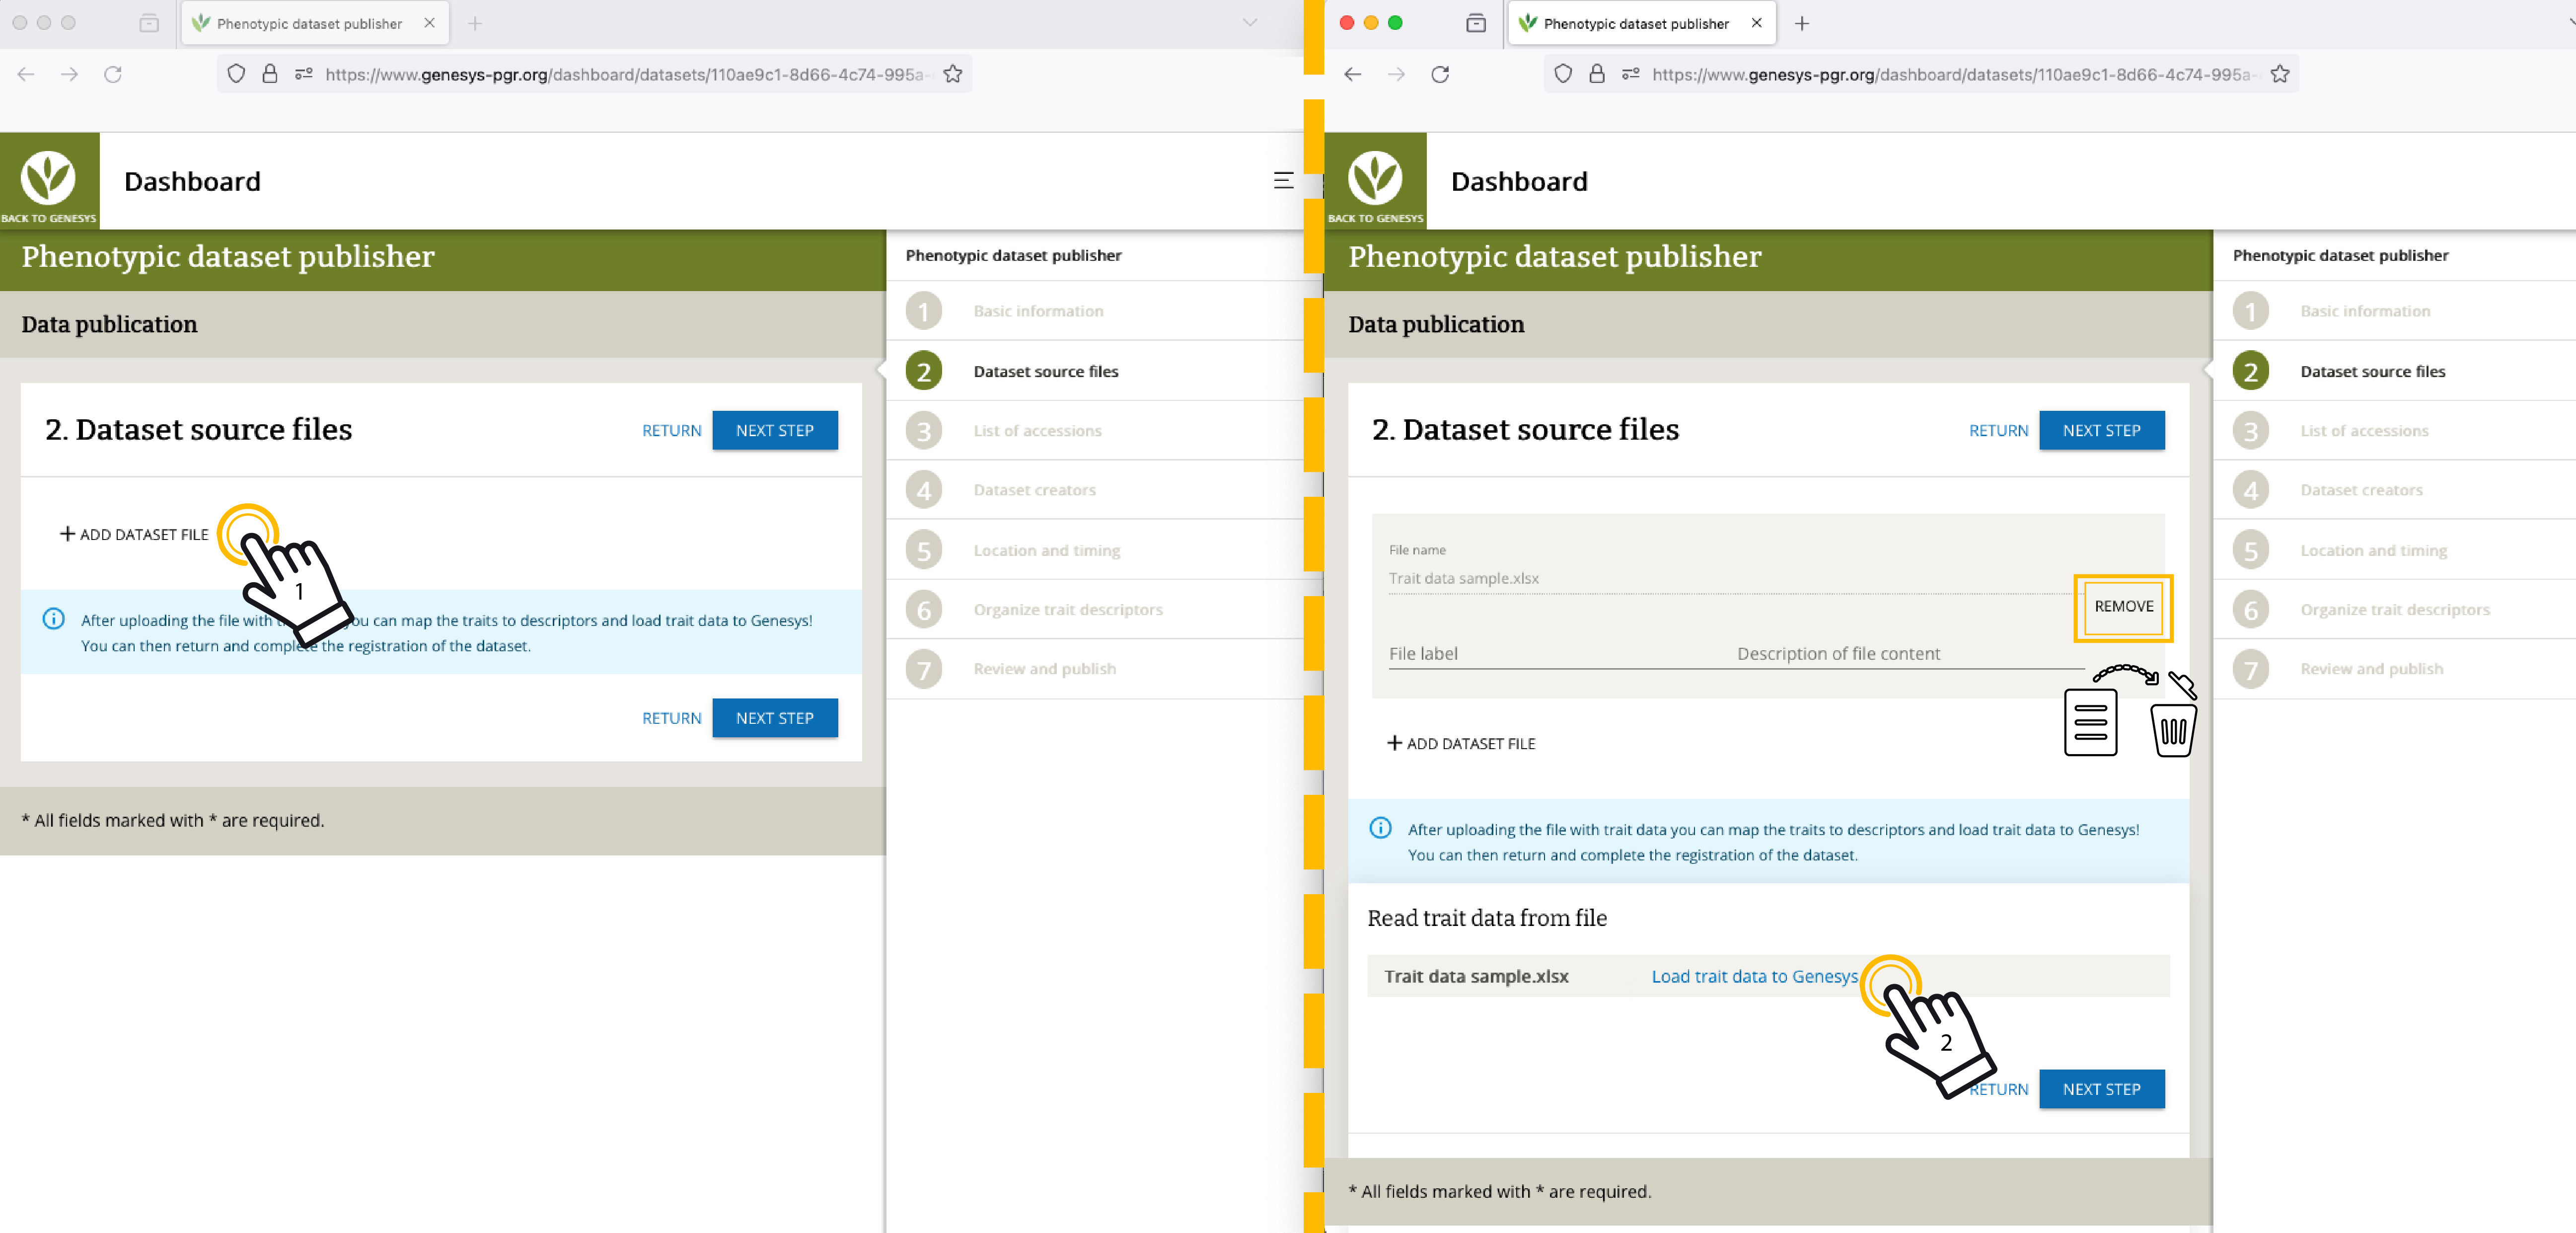 Figure 4: Adding source file
Step 2.1: Link accessions to passport data in Genesys
This is the most important step in the process. The accessions in your Excel file must be linked to their passport data in Genesys. If this step does not complete successfully, the next steps will not be available.
You will know accessions are not yet linked when the first column, titled "Accessions" (which Genesys adds automatically), is empty. When accessions are successfully linked, the "Accessions" column will be populated with links to passport data.
Properties: Set default properties such as crop name, genebank, and genus.
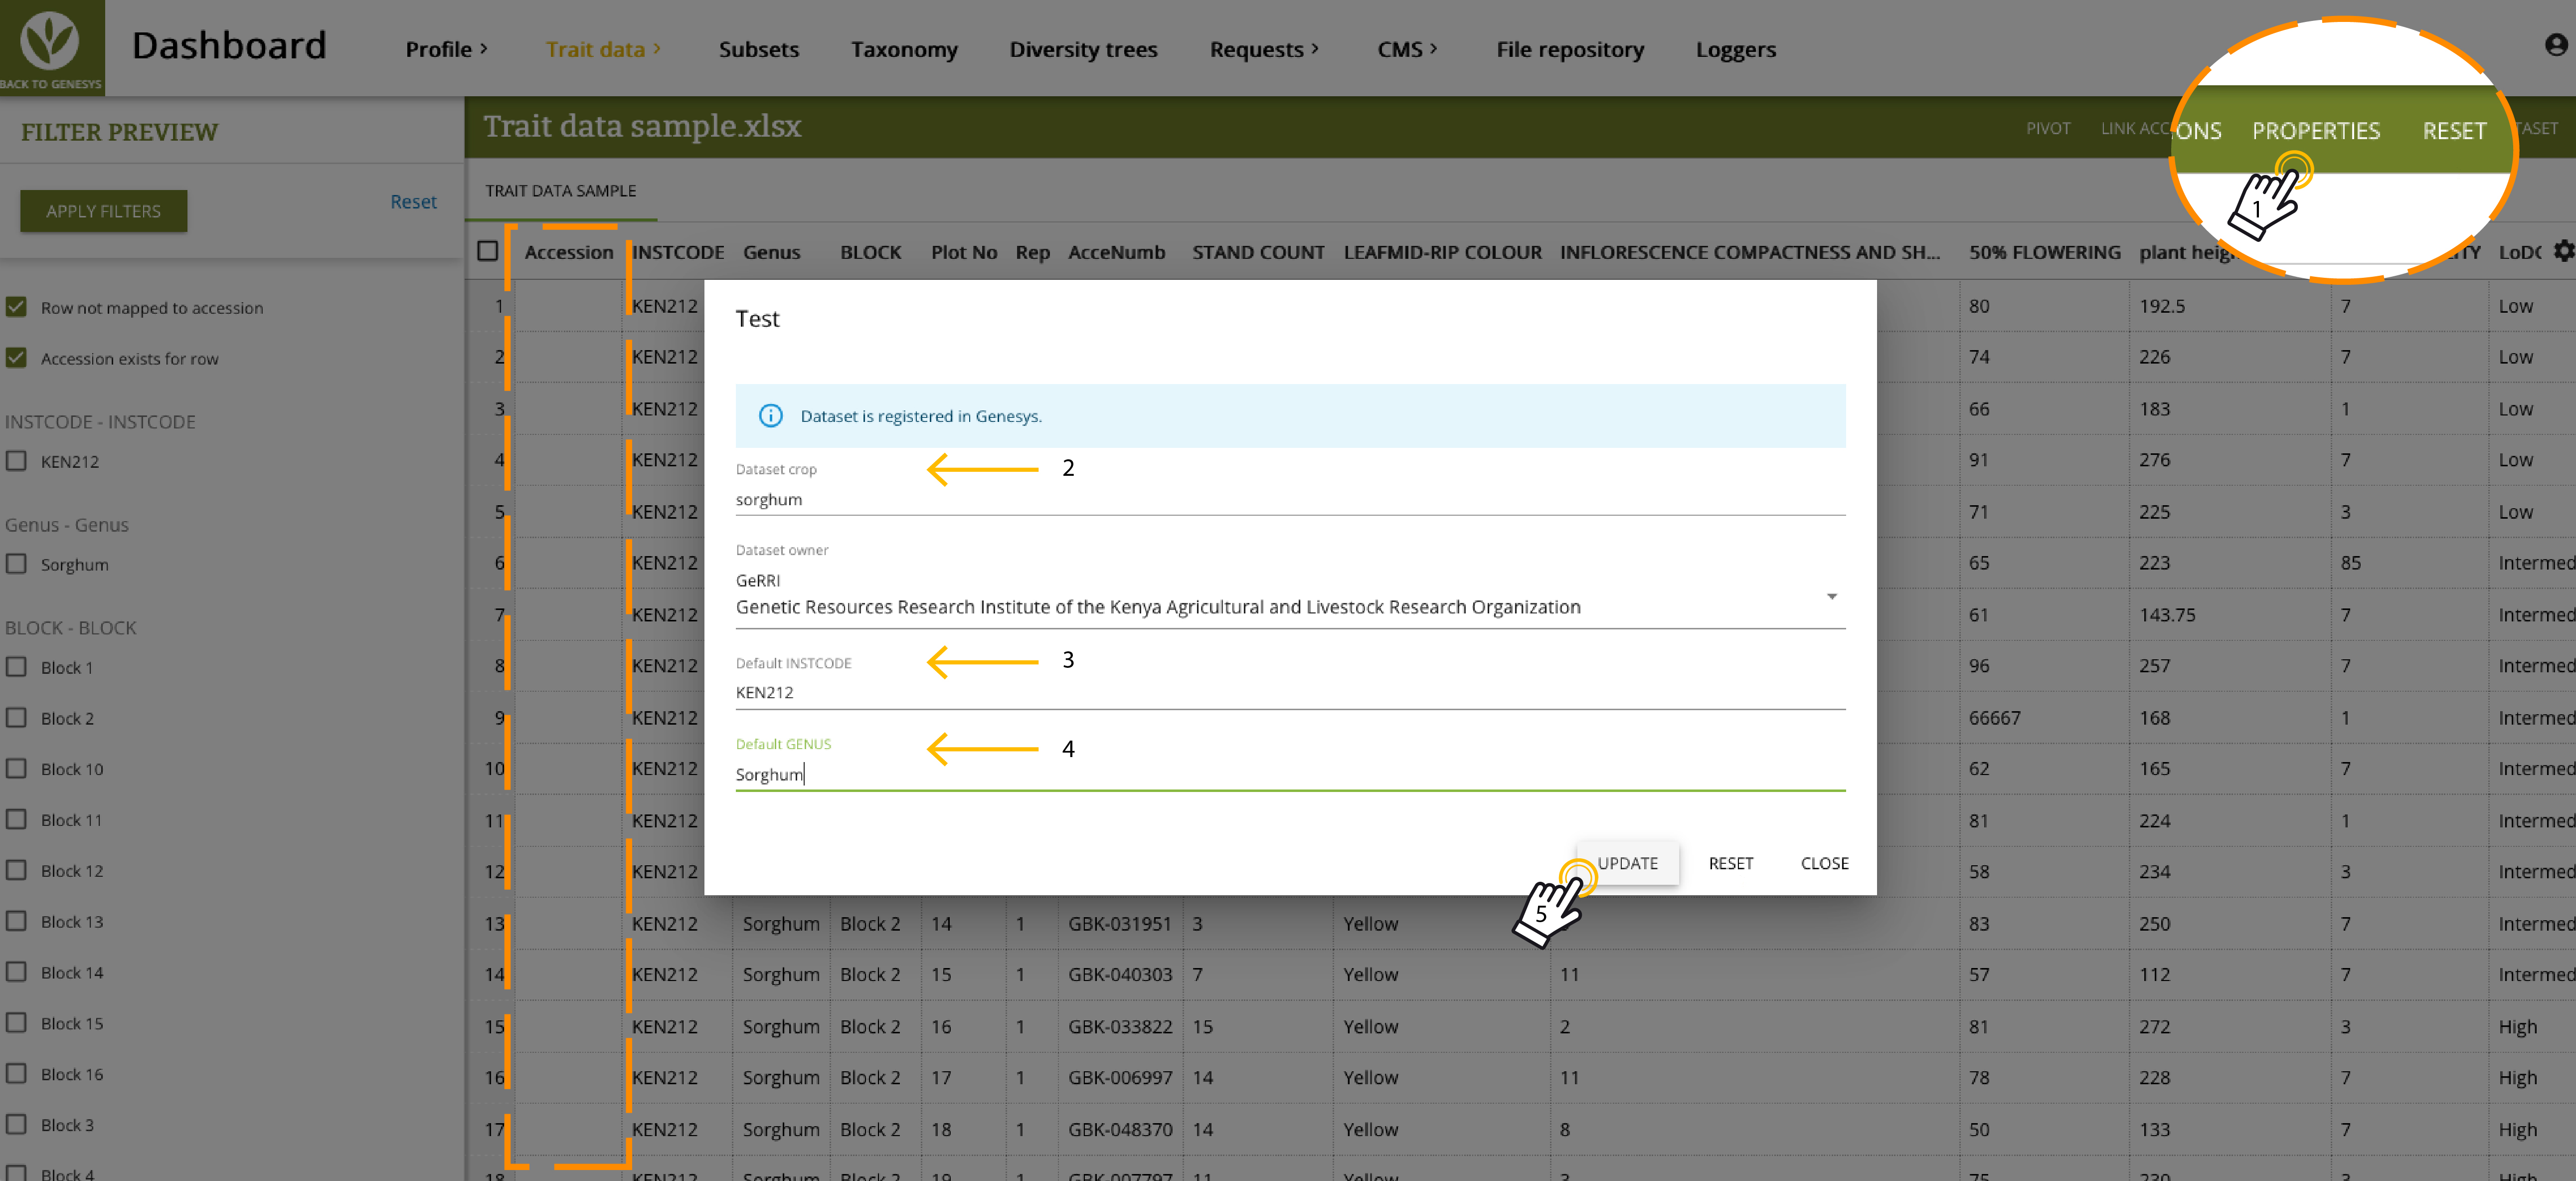 Figure 5: Set properties
Map required columns: Click on the required column titles (Institute Code, Genus, Accession Number, and DOI if available) and rename them to the corresponding MCPD descriptors in Genesys (INSTCODE, GENUS, ACCENUMB, and DOI). Only change the "Column name" field, then press Enter.
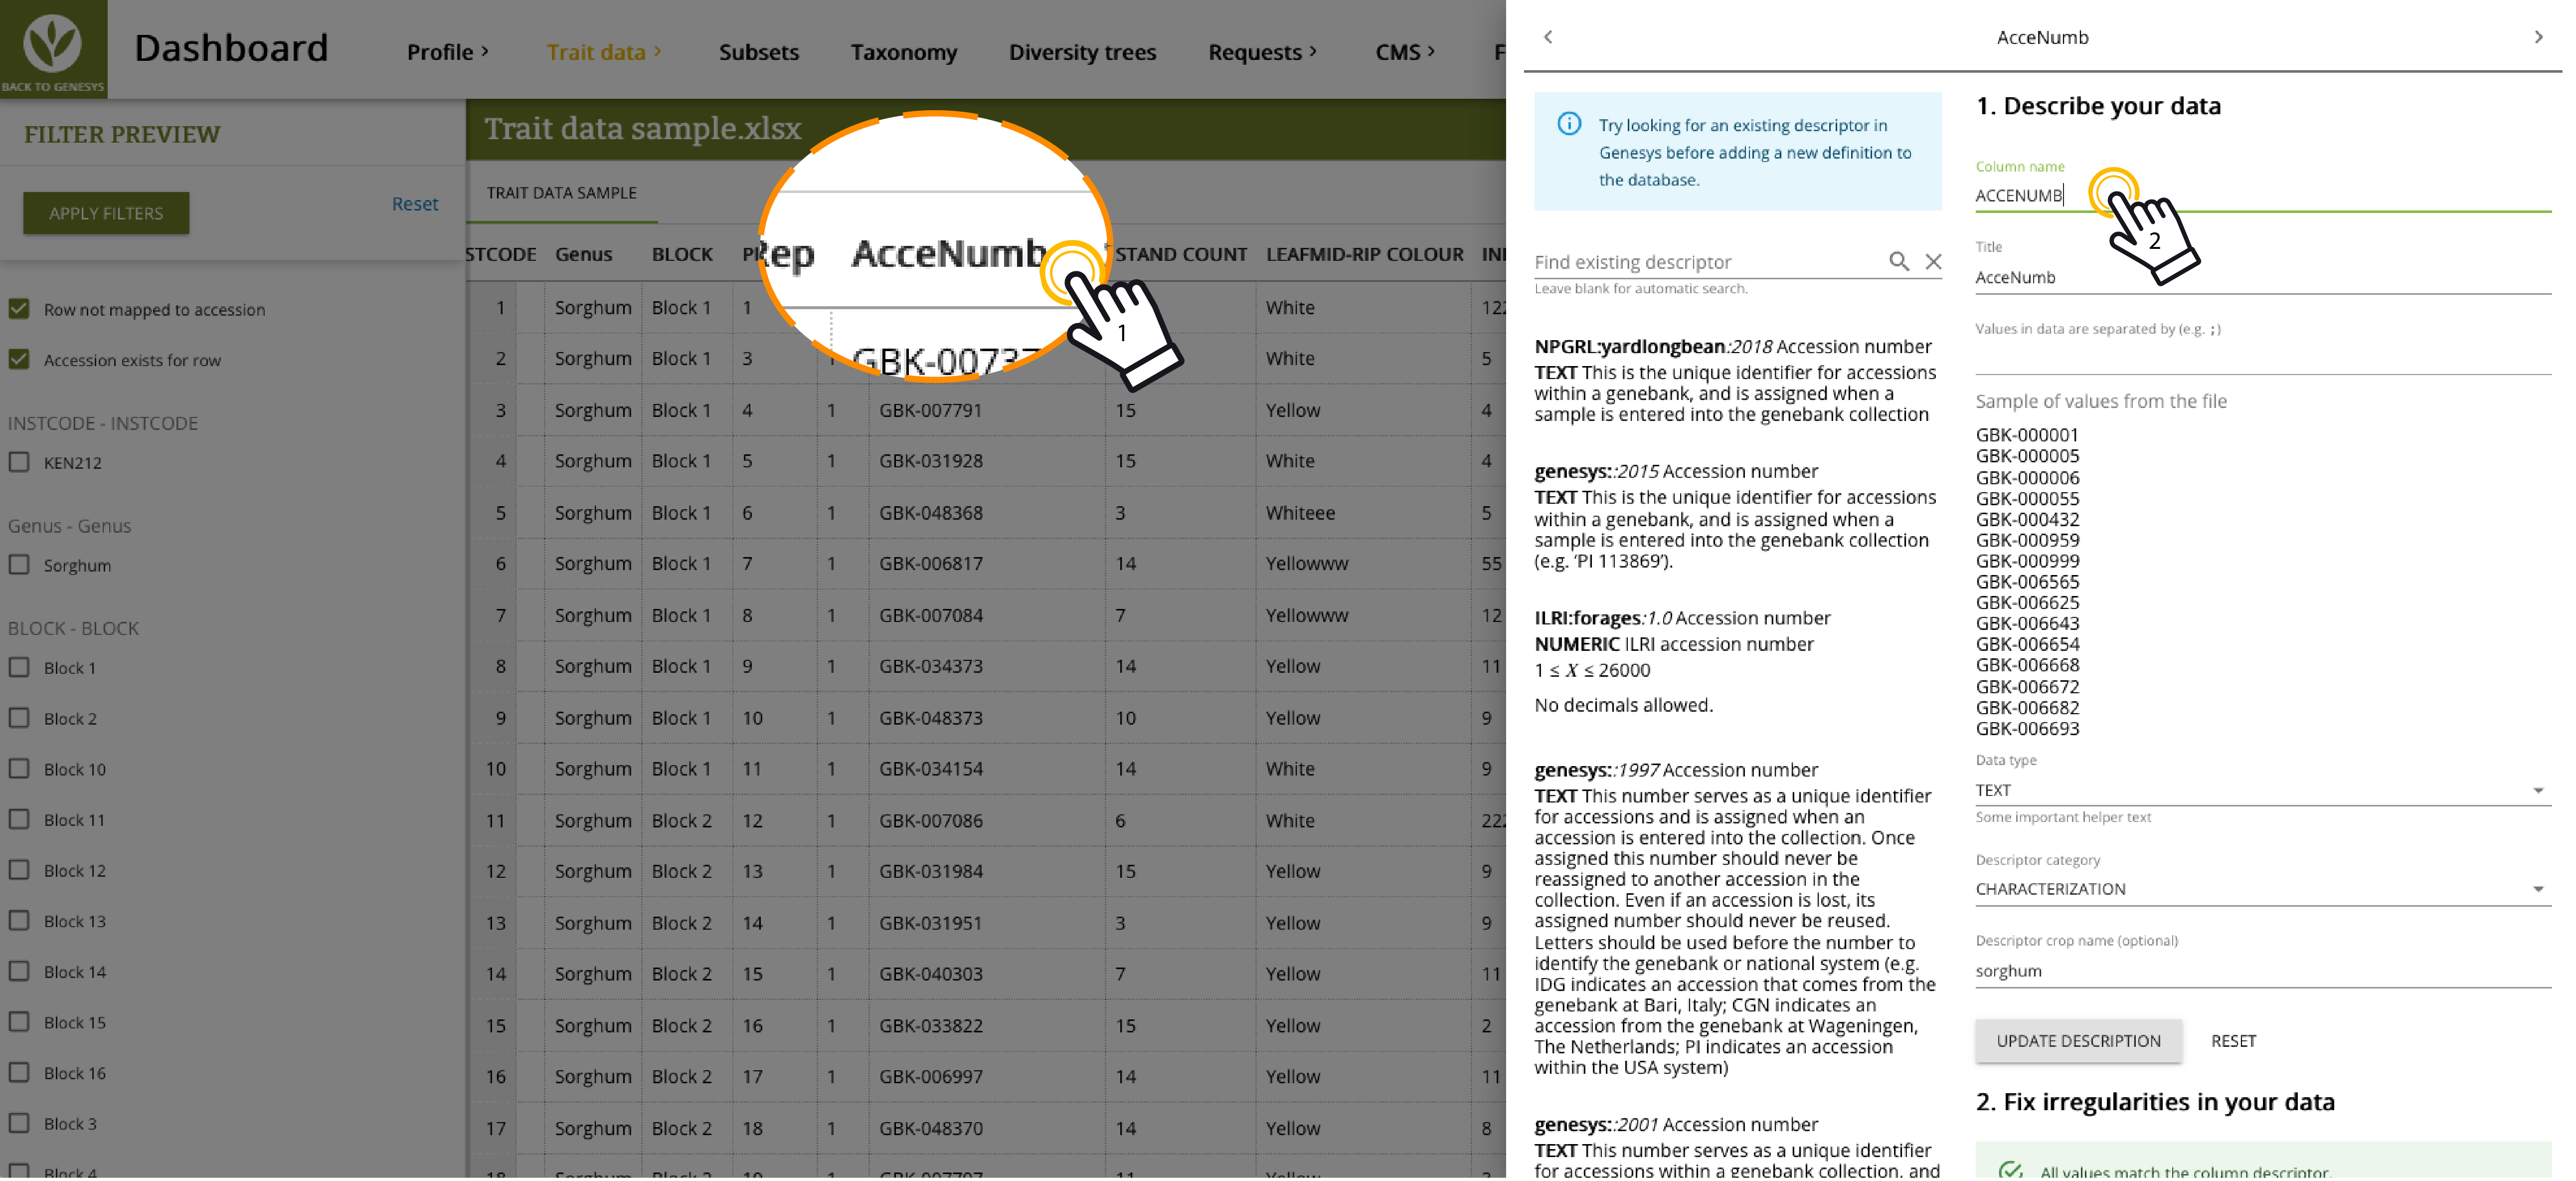 Figure 6: Map minimum passport data columns
Link accessions: Click "Link Accessions" to connect your data columns with the existing passport data in Genesys. This populates the first column, titled "Accession", with links to the accession passport data.
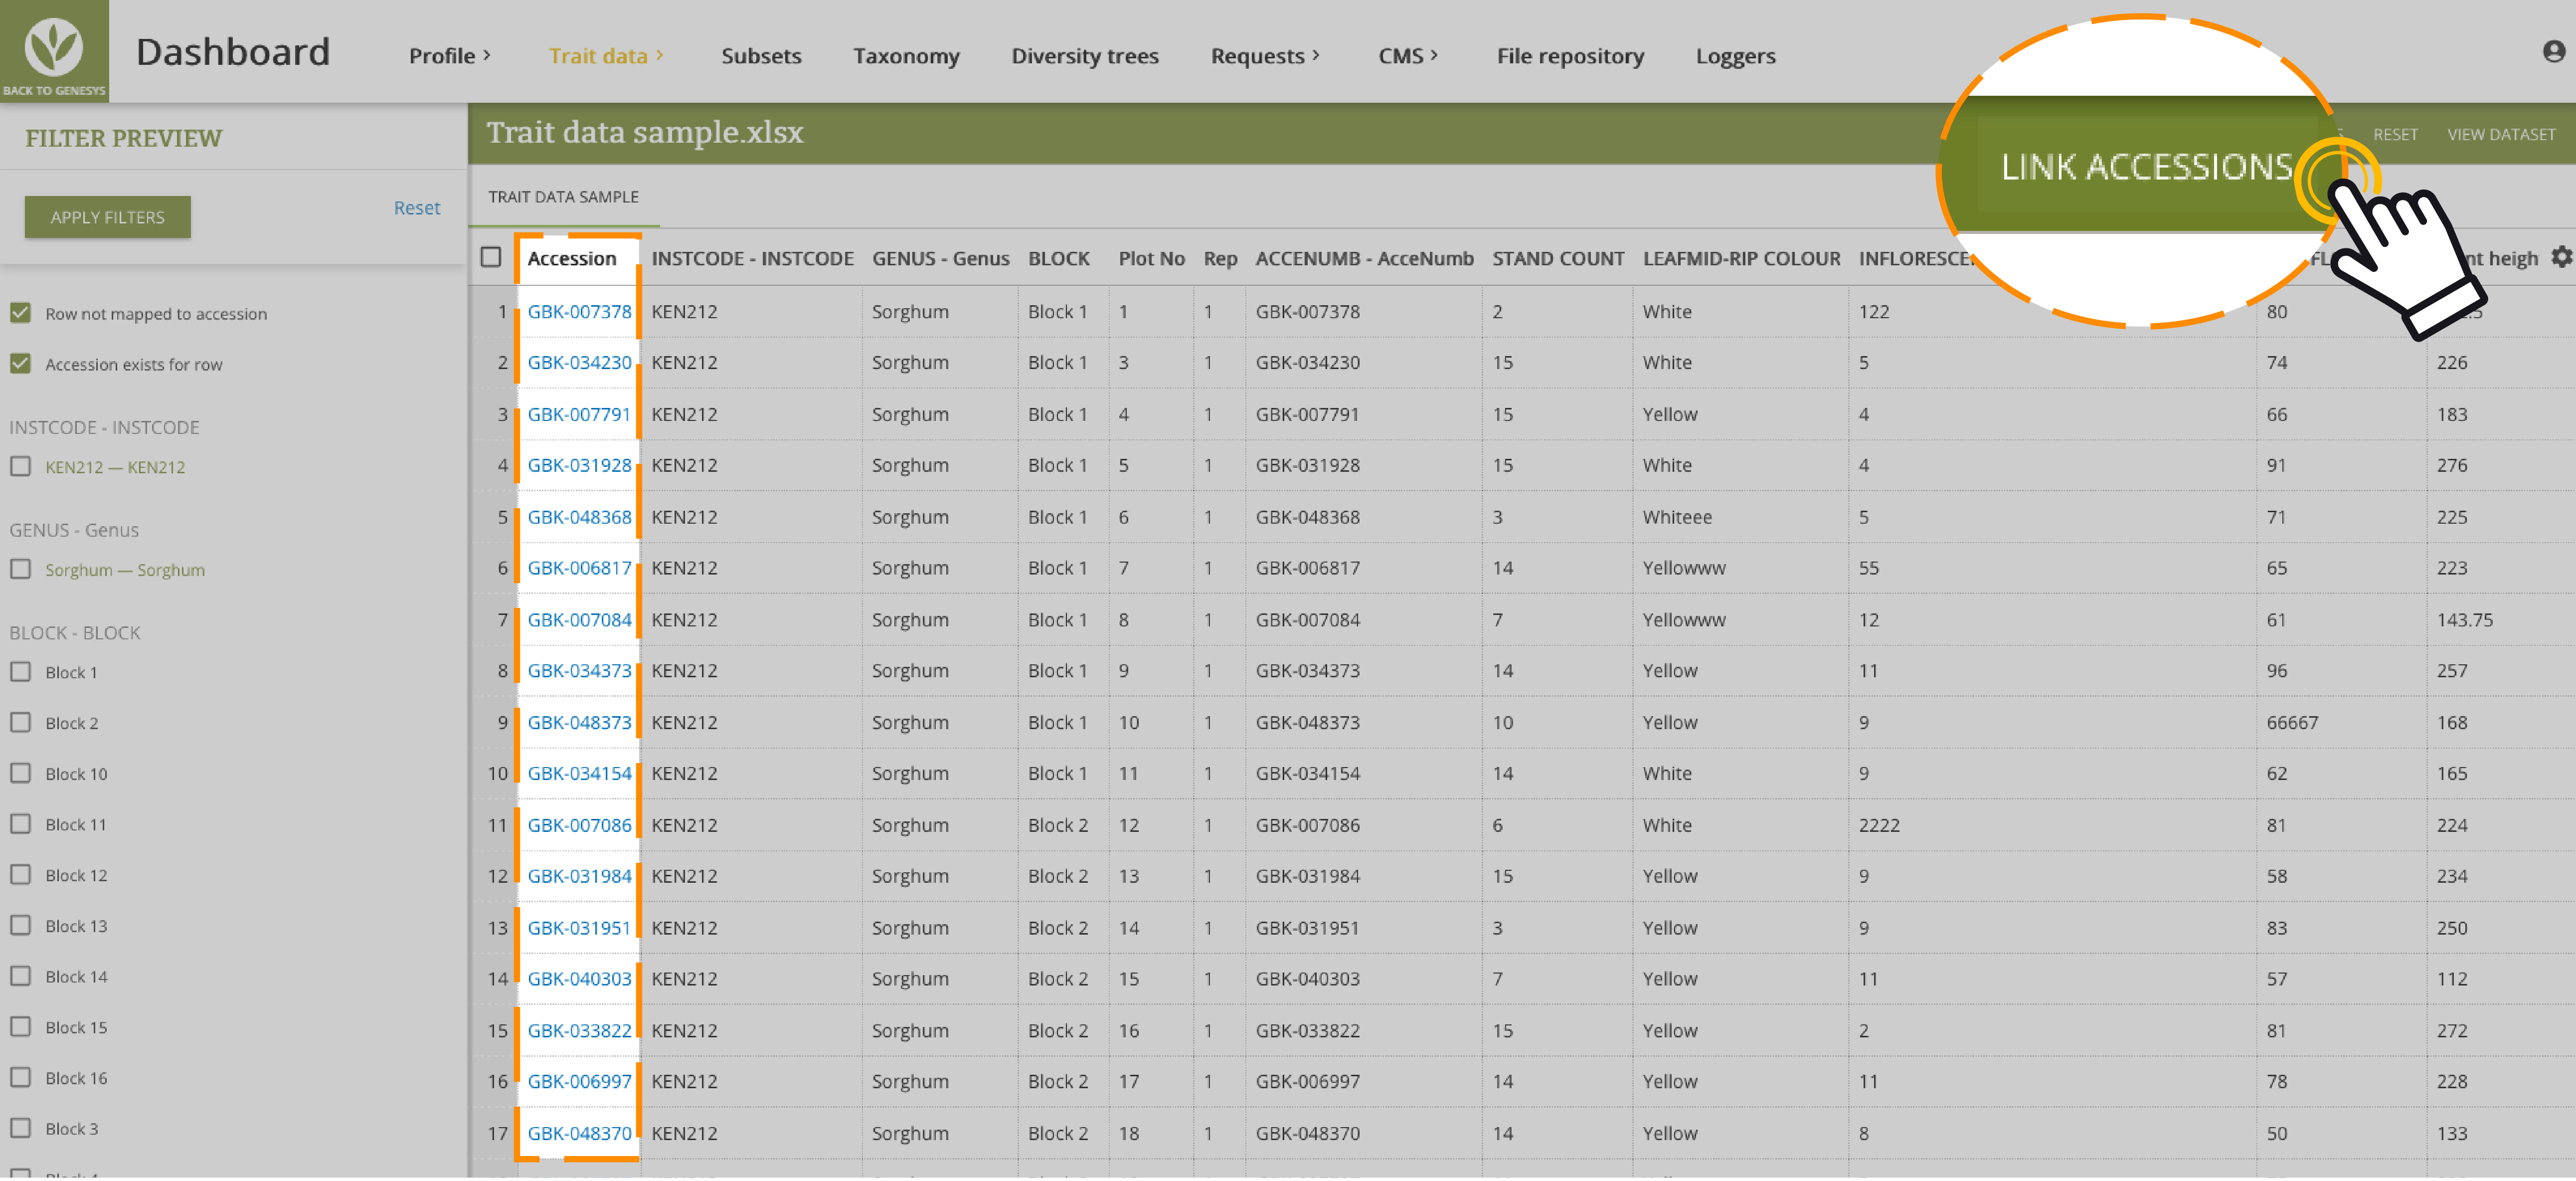 Figure 7: Link accessions to passport data in Genesys
Verification: Check that all accessions are successfully linked by verifying that the first column, "Accession", is fully populated. To do this, untick the second filter in the filter pane on the left-hand side, titled "Accession exists for now", and keep only the first one, titled "Row not mapped to accession". Then click "Apply filters".
If all accessions were linked successfully, you will see the message "No records match the selected criteria".
To view the entire unfiltered trait dataset again, click the "Reset" button.
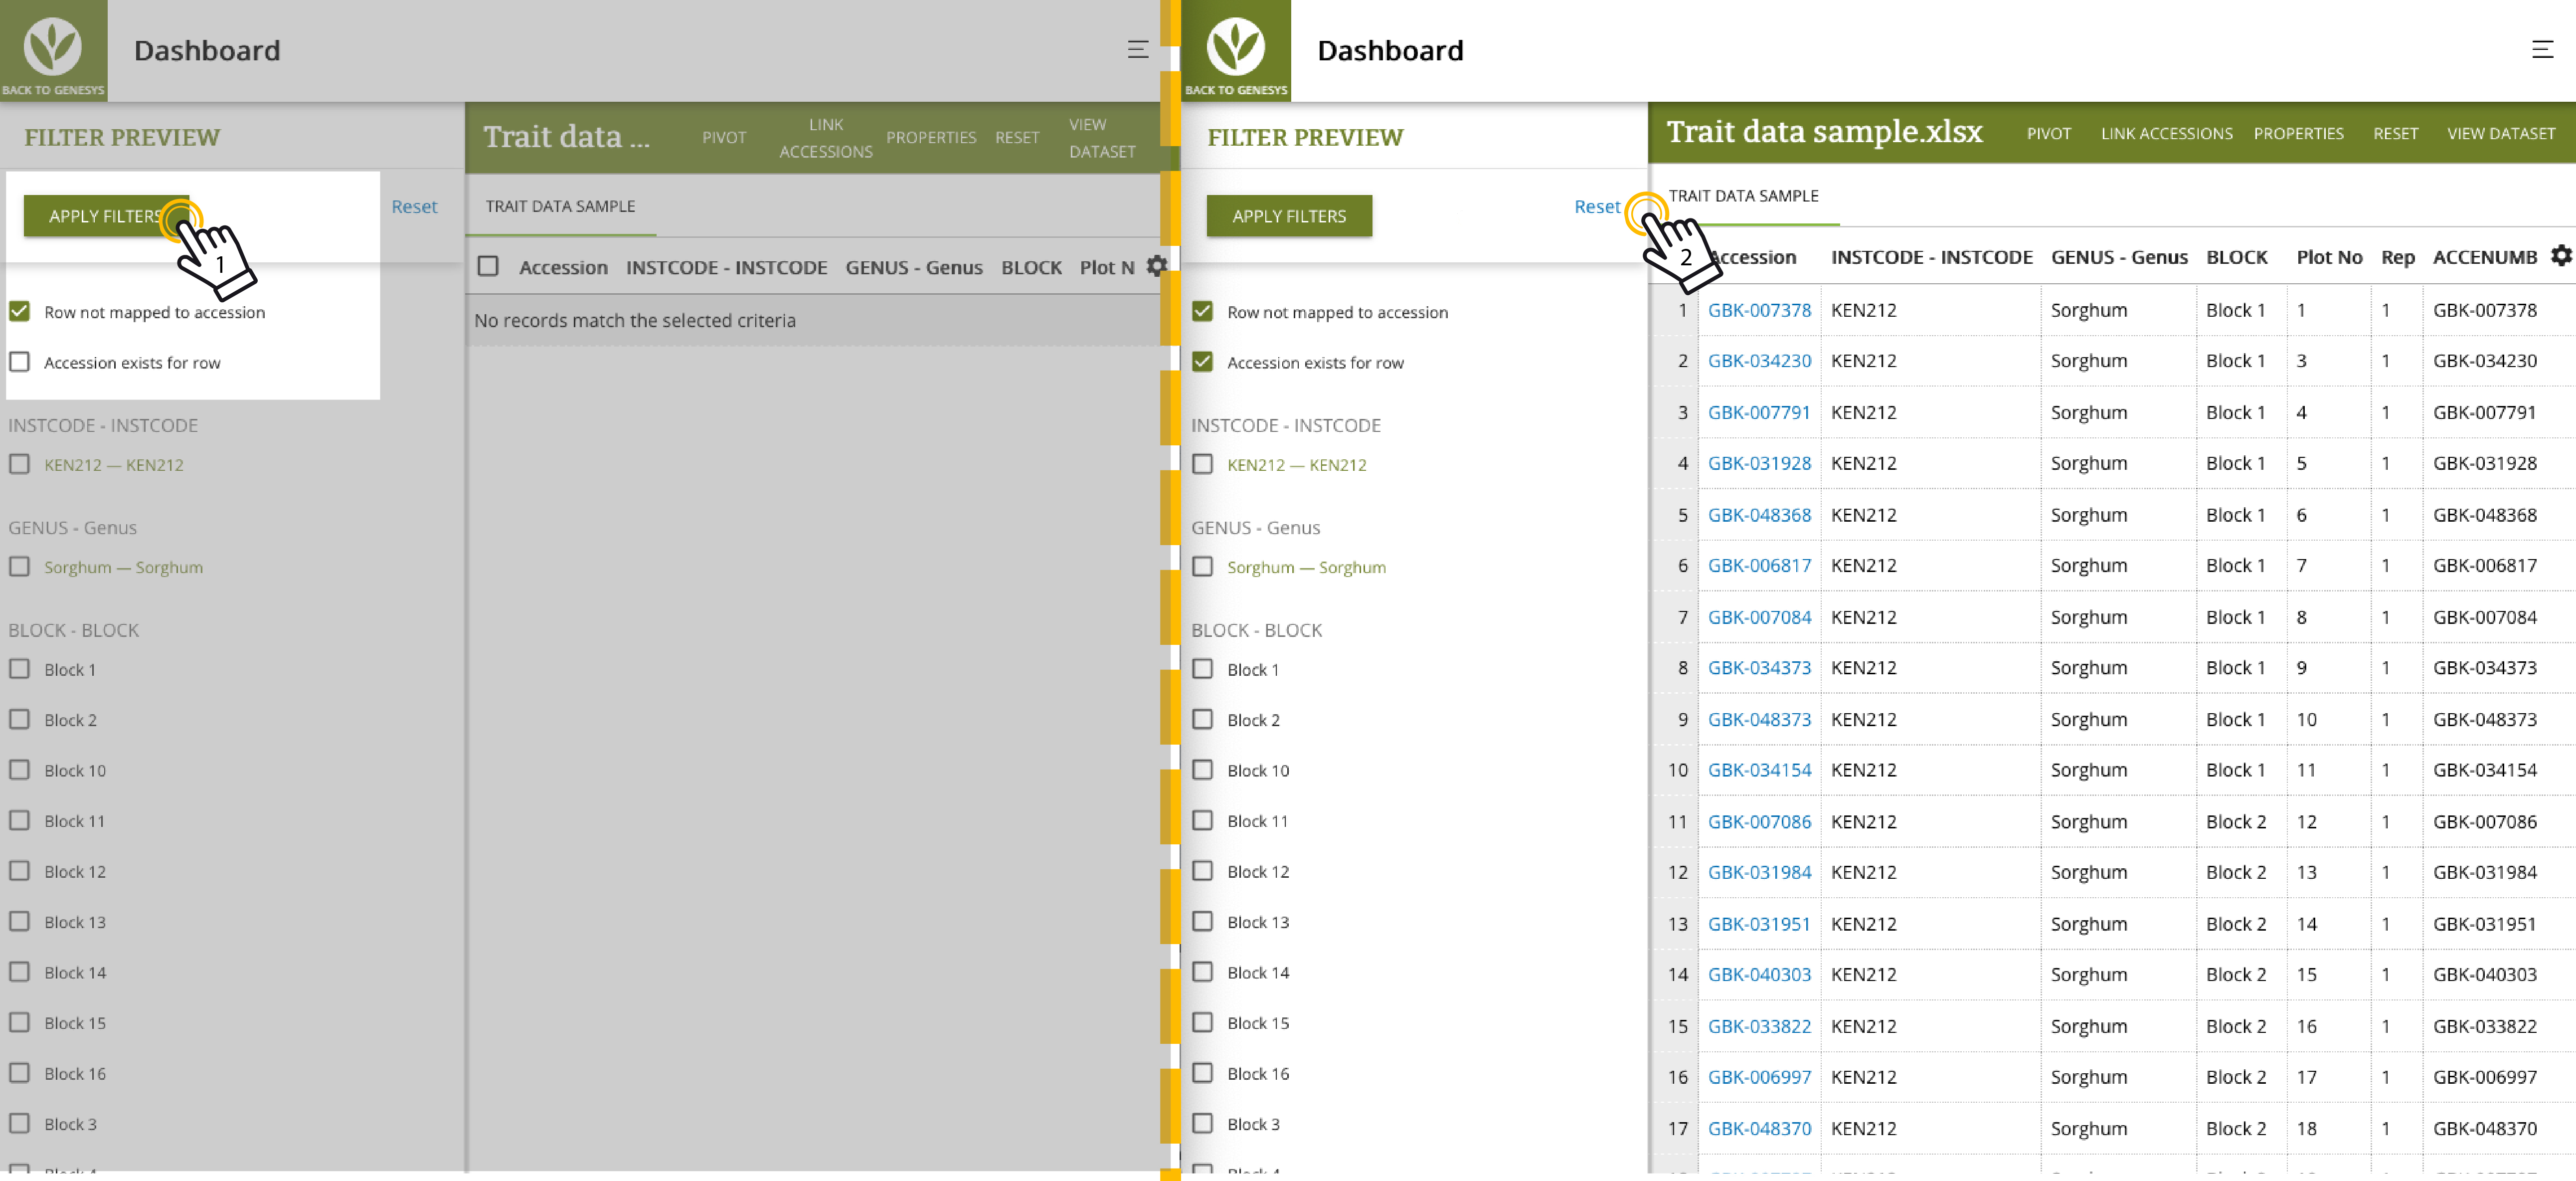 Figure 8: Check for unlinked accessions
Step 2.2: Map trait data to existing descriptors
Link your data columns to existing descriptors in Genesys whenever possible.
Link to existing descriptors: Click on the trait column title. A dialog box opens, prompting you to search for existing descriptors in Genesys on the left-hand side. If you find the descriptor that matches your trait, click on it to link it to your column automatically.
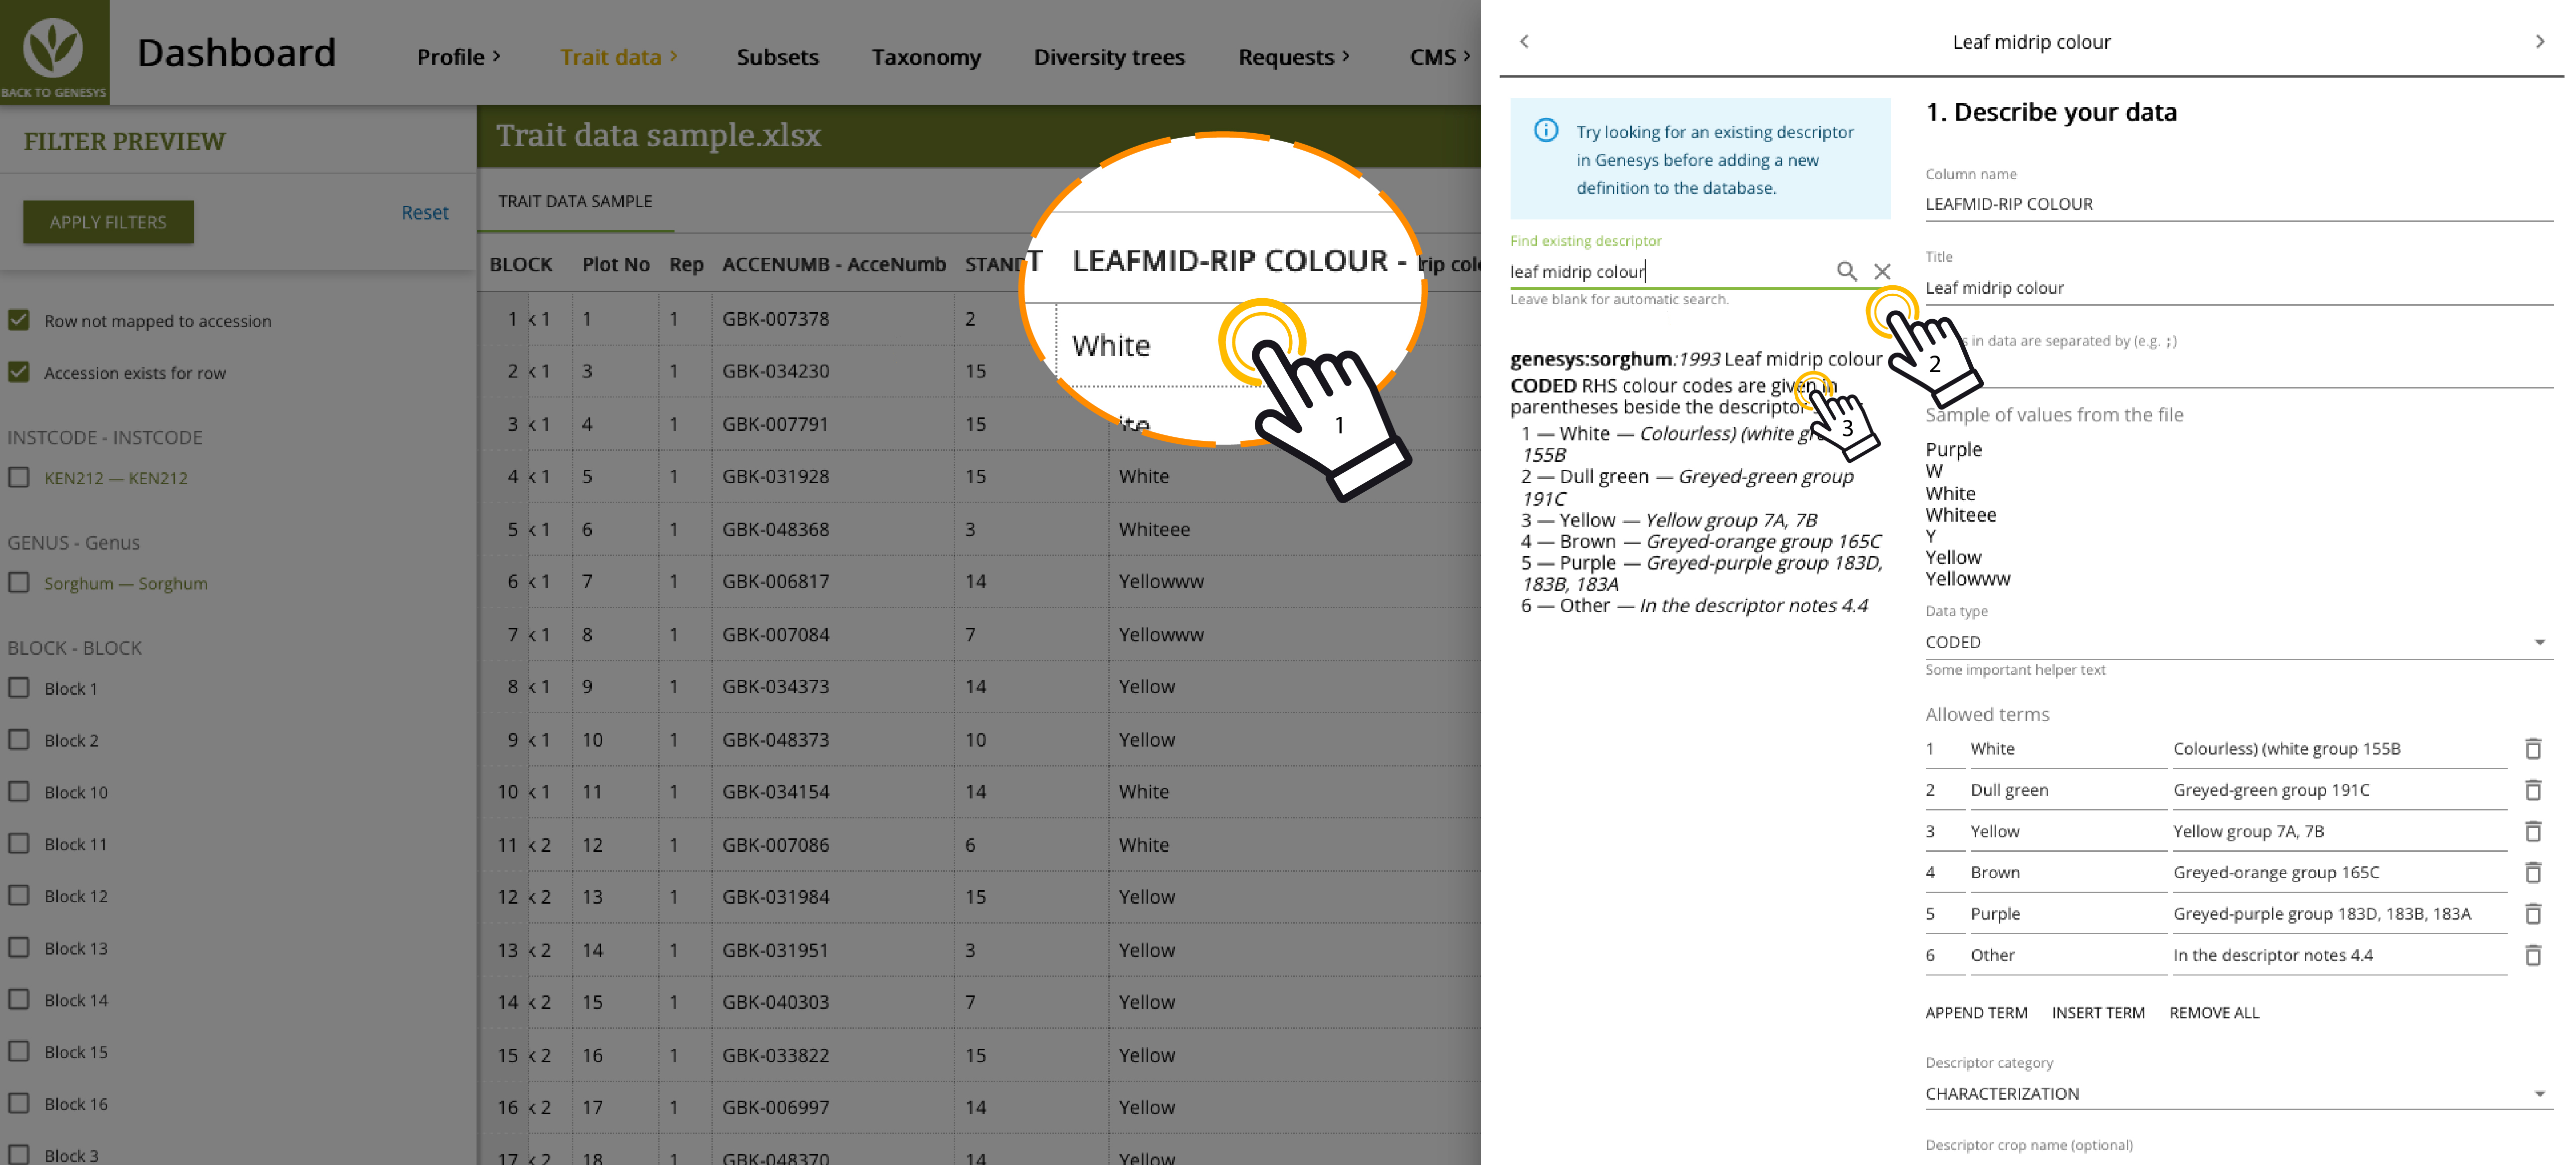 Figure 9: Map column to an existing descriptor in the Genesys database
Handling error messages: When mapping your data to an existing descriptor, you might encounter errors if some values in your file do not match the allowed values for that descriptor. An error message will appear, indicating that some values do not match the descriptor criteria. The Genesys interface highlights the mismatched values in your dataset. If the system guess is not accurate, manually map each incorrect value to the correct one. Use the tool to change the mismatched values to the nearest acceptable value defined in the descriptor.
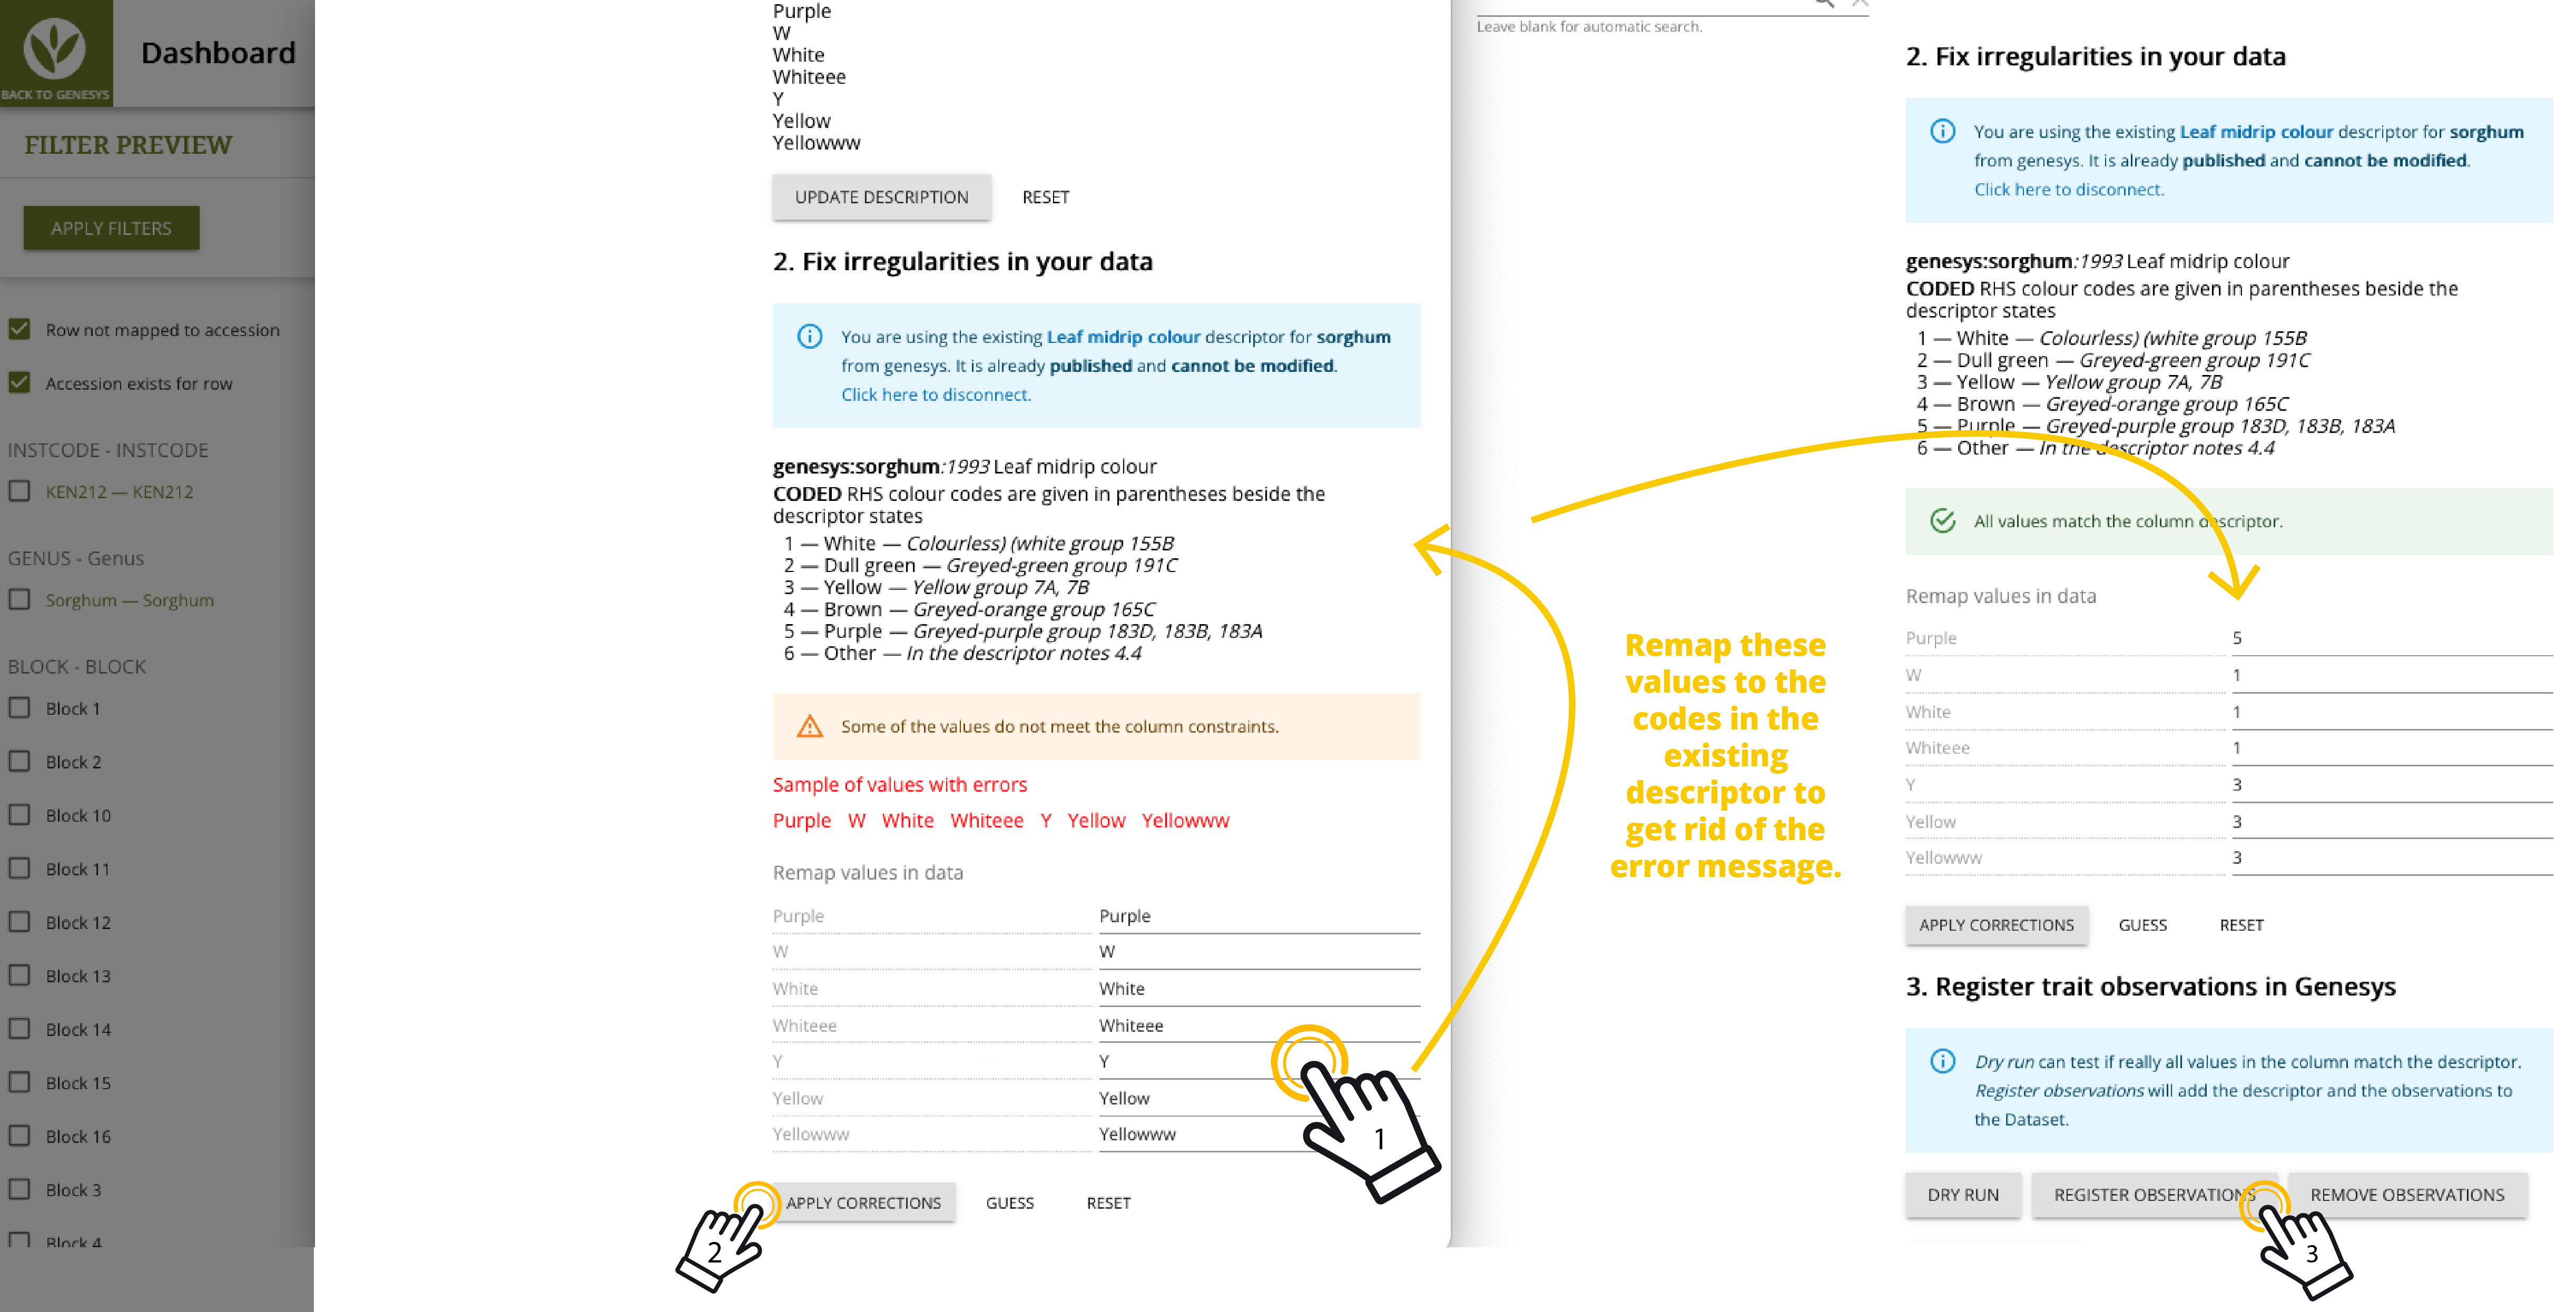 Figure 10: Fix irregularities in the data and register observations
Register observations: After correcting all mismatched values, click "Register observations" to finalise the linkage. This step is important. Skipping "Register observations" means the trait data in that column will not be included in the published dataset. You may use the "Dry run" button first to check for any remaining mismatches. If you click "Dry run", you still need to click "Register observations" afterwards.
After applying these steps, preview how the dataset will appear by clicking "View Dataset". Verify that all corrected values are properly linked and displayed.
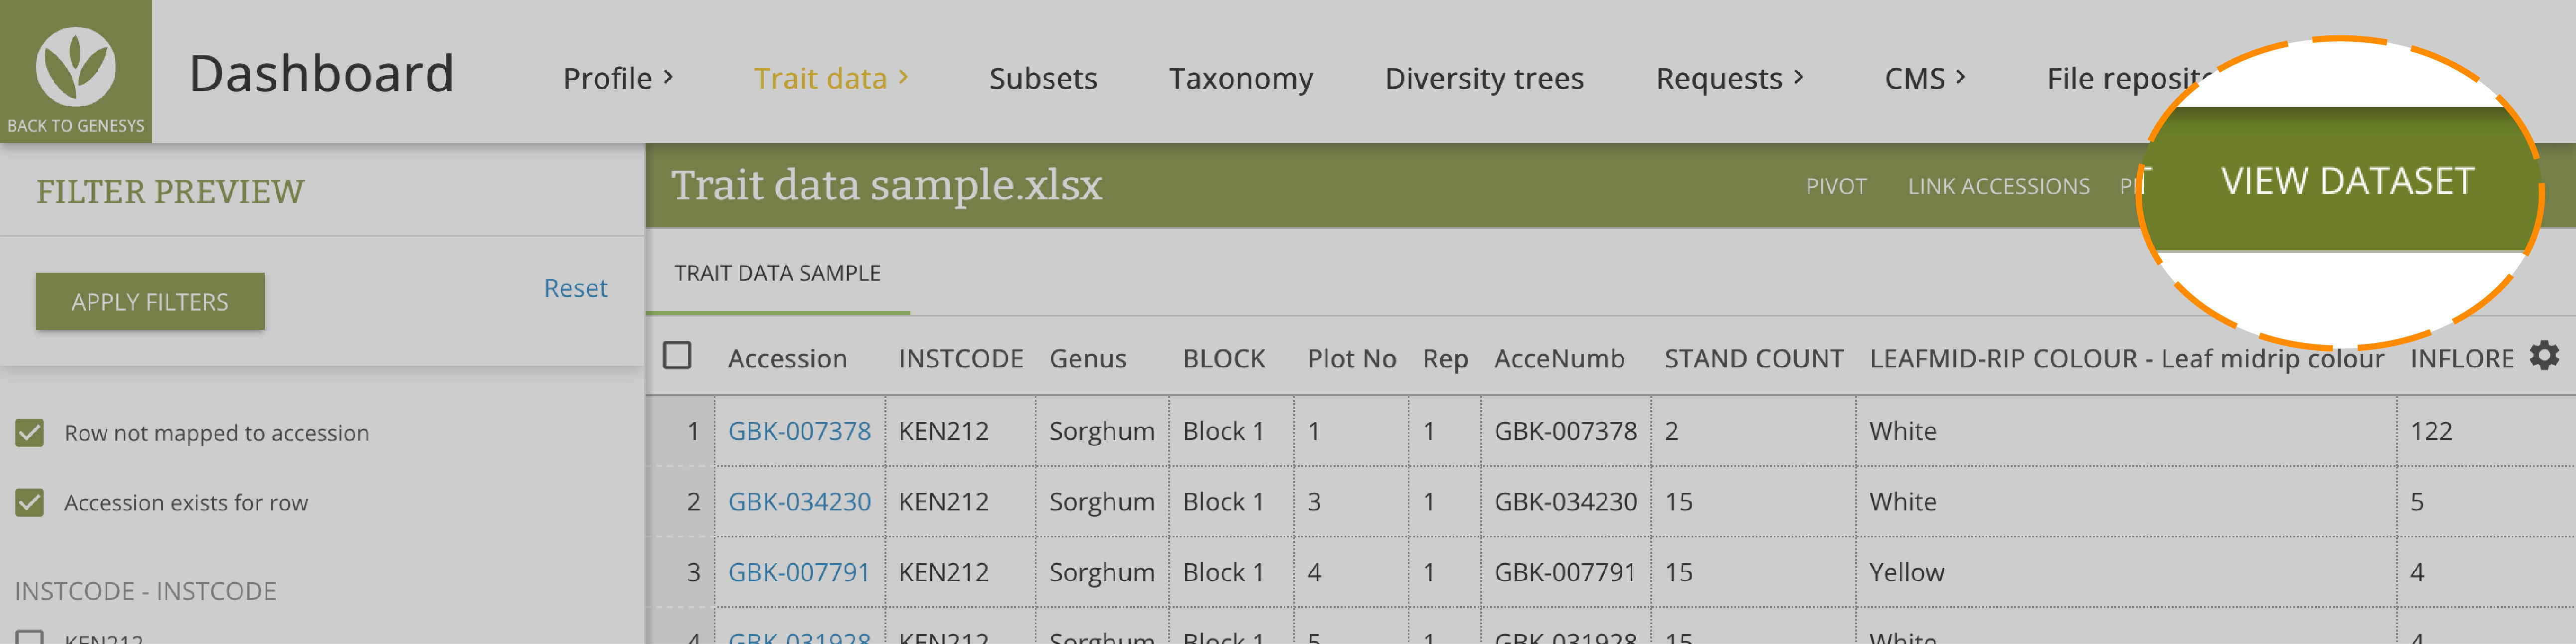 Figure 11: Preview dataset
Step 2.3: Map trait data to new descriptors
If Genesys cannot find an existing descriptor that matches a trait column, you can create a new descriptor directly during the upload process.
-
Enter descriptor details: Click on the column header for the trait you want to create a new descriptor for. Then describe your data column by entering the following information:
- Title: Enter a clear and descriptive title. Leave the "Column name" field as it is, and only change "Title", because this is what users will see when the dataset is published. Do not add units in the title, because there is a dedicated field for that.
- Separator: If you have multiple values in the same cell (for example, purple, white, yellow), specify the separator. It can be a space, dash, comma, semicolon, or another character.
- Data Type: Select the appropriate data type. See the note below on data types.
- Allowed Values: Define the possible values for coded or scale data, including a description for each value.
- Unit of measurement: For numeric descriptors, specify the unit of measurement.
- Minimum and maximum values: For numerical descriptors, specify the minimum and maximum values allowed for this descriptor. These define the acceptable range, not the minimum and maximum values found in your specific dataset. For example, the minimum allowed value for plant height is 0 because height cannot be negative, not 100 cm as found in your dataset. For scale descriptors, you need to specify the minimum and maximum values because these define the range of your scale.
- Type of numeric values: Specify whether the numeric descriptor is discrete (allows only values without decimal points) or continuous (allows both values with and without decimal points). The decimal symbol in your data should be a point, not a comma.
- Category: Specify the descriptor category, such as characterisation, evaluation, or another category.
-
Validate data:
- Check values: Make sure all the values in your data column match the allowed values and formats specified in the descriptor.
- Correct irregularities: Use the Genesys interface to remap or correct any data entries that do not conform to the descriptor validation criteria.
-
Save descriptor to Genesys:
- Add the version of this descriptor, for example, version 1.0 or 2024.1.
- Include additional metadata such as the methodology for data collection, any relevant information, and descriptions.
- Add the code of the descriptor language, for example, en for English or fr for French.
- Click "Register a new descriptor in Genesys" to save the new descriptor.
-
Register observations: After correcting all mismatched values, click "Register observations" to finalise the linkage. This step is important. Skipping "Register observations" means the trait data in that column will not be included in the published dataset. You may use the "Dry run" button first to check for any remaining mismatches. If you click "Dry run", you still need to click "Register observations" afterwards.
Coded data represents distinct categories or groups, typically using numbers or strings as codes. Scale data consists of coded data that follows a certain hierarchy where the differences between values are meaningful. Numeric data includes both integers and floating-point numbers used for quantitative measurements. Text data represents sequences of characters used to store words and text, including letters, numbers, and symbols. Date data type is used to represent dates and times in various formats. Boolean data type represents two possible values, for example, true or false.
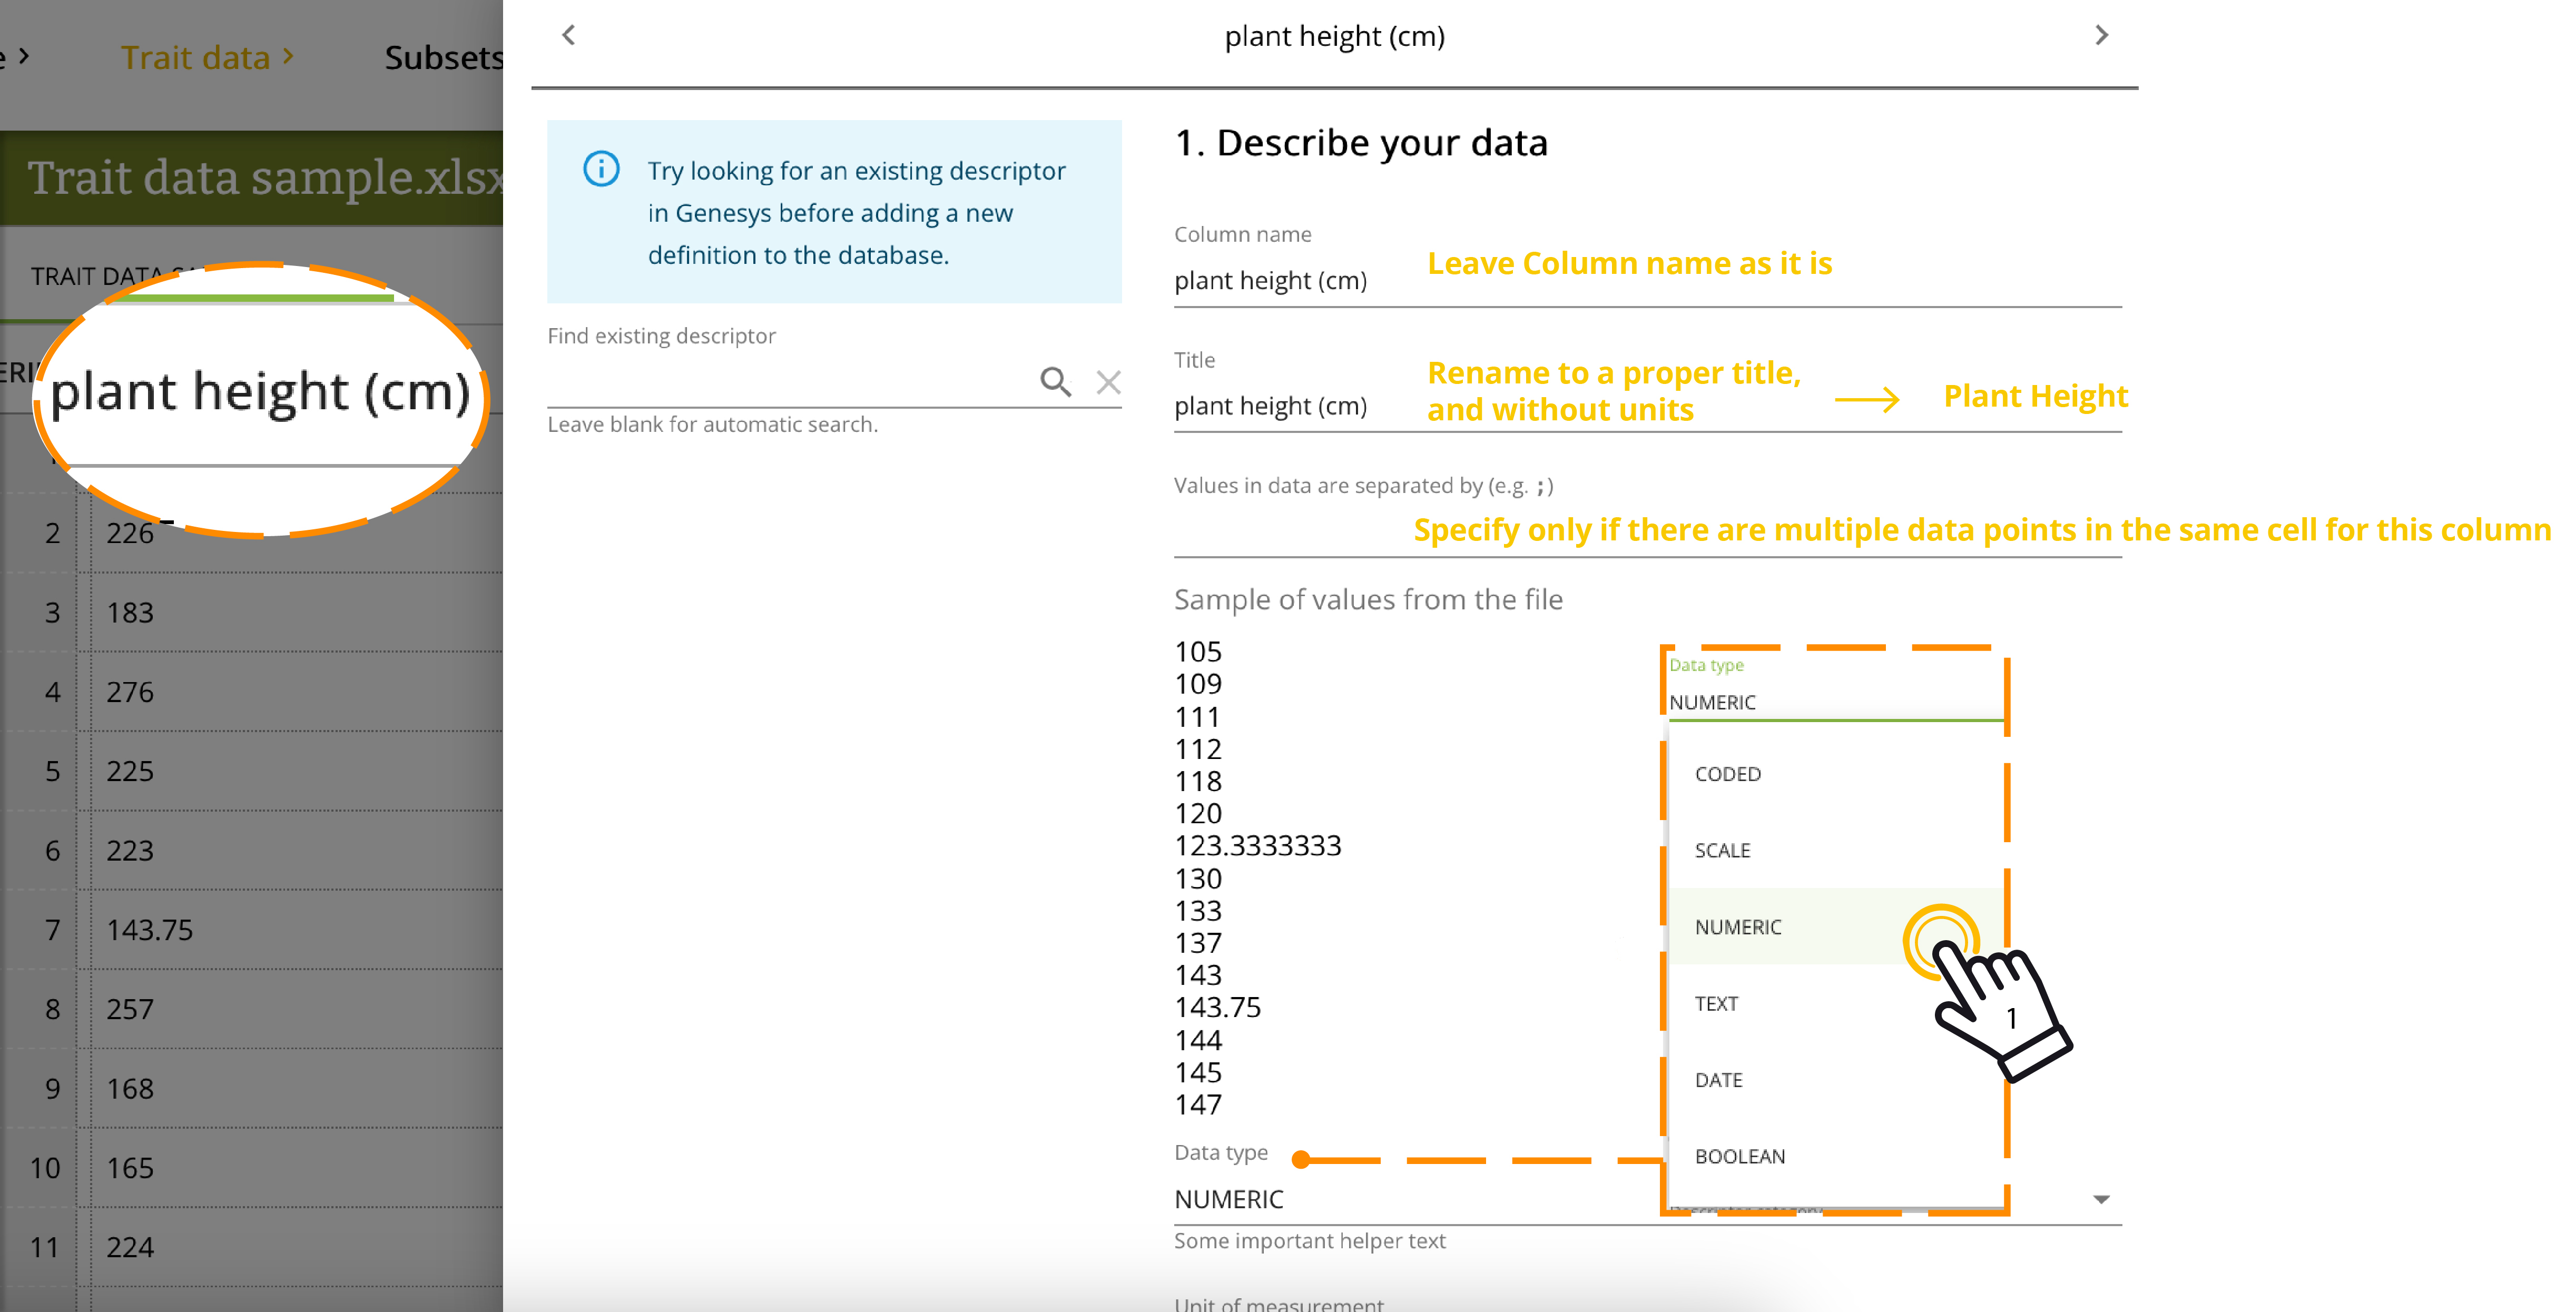 Figure 12: Describe a new descriptor
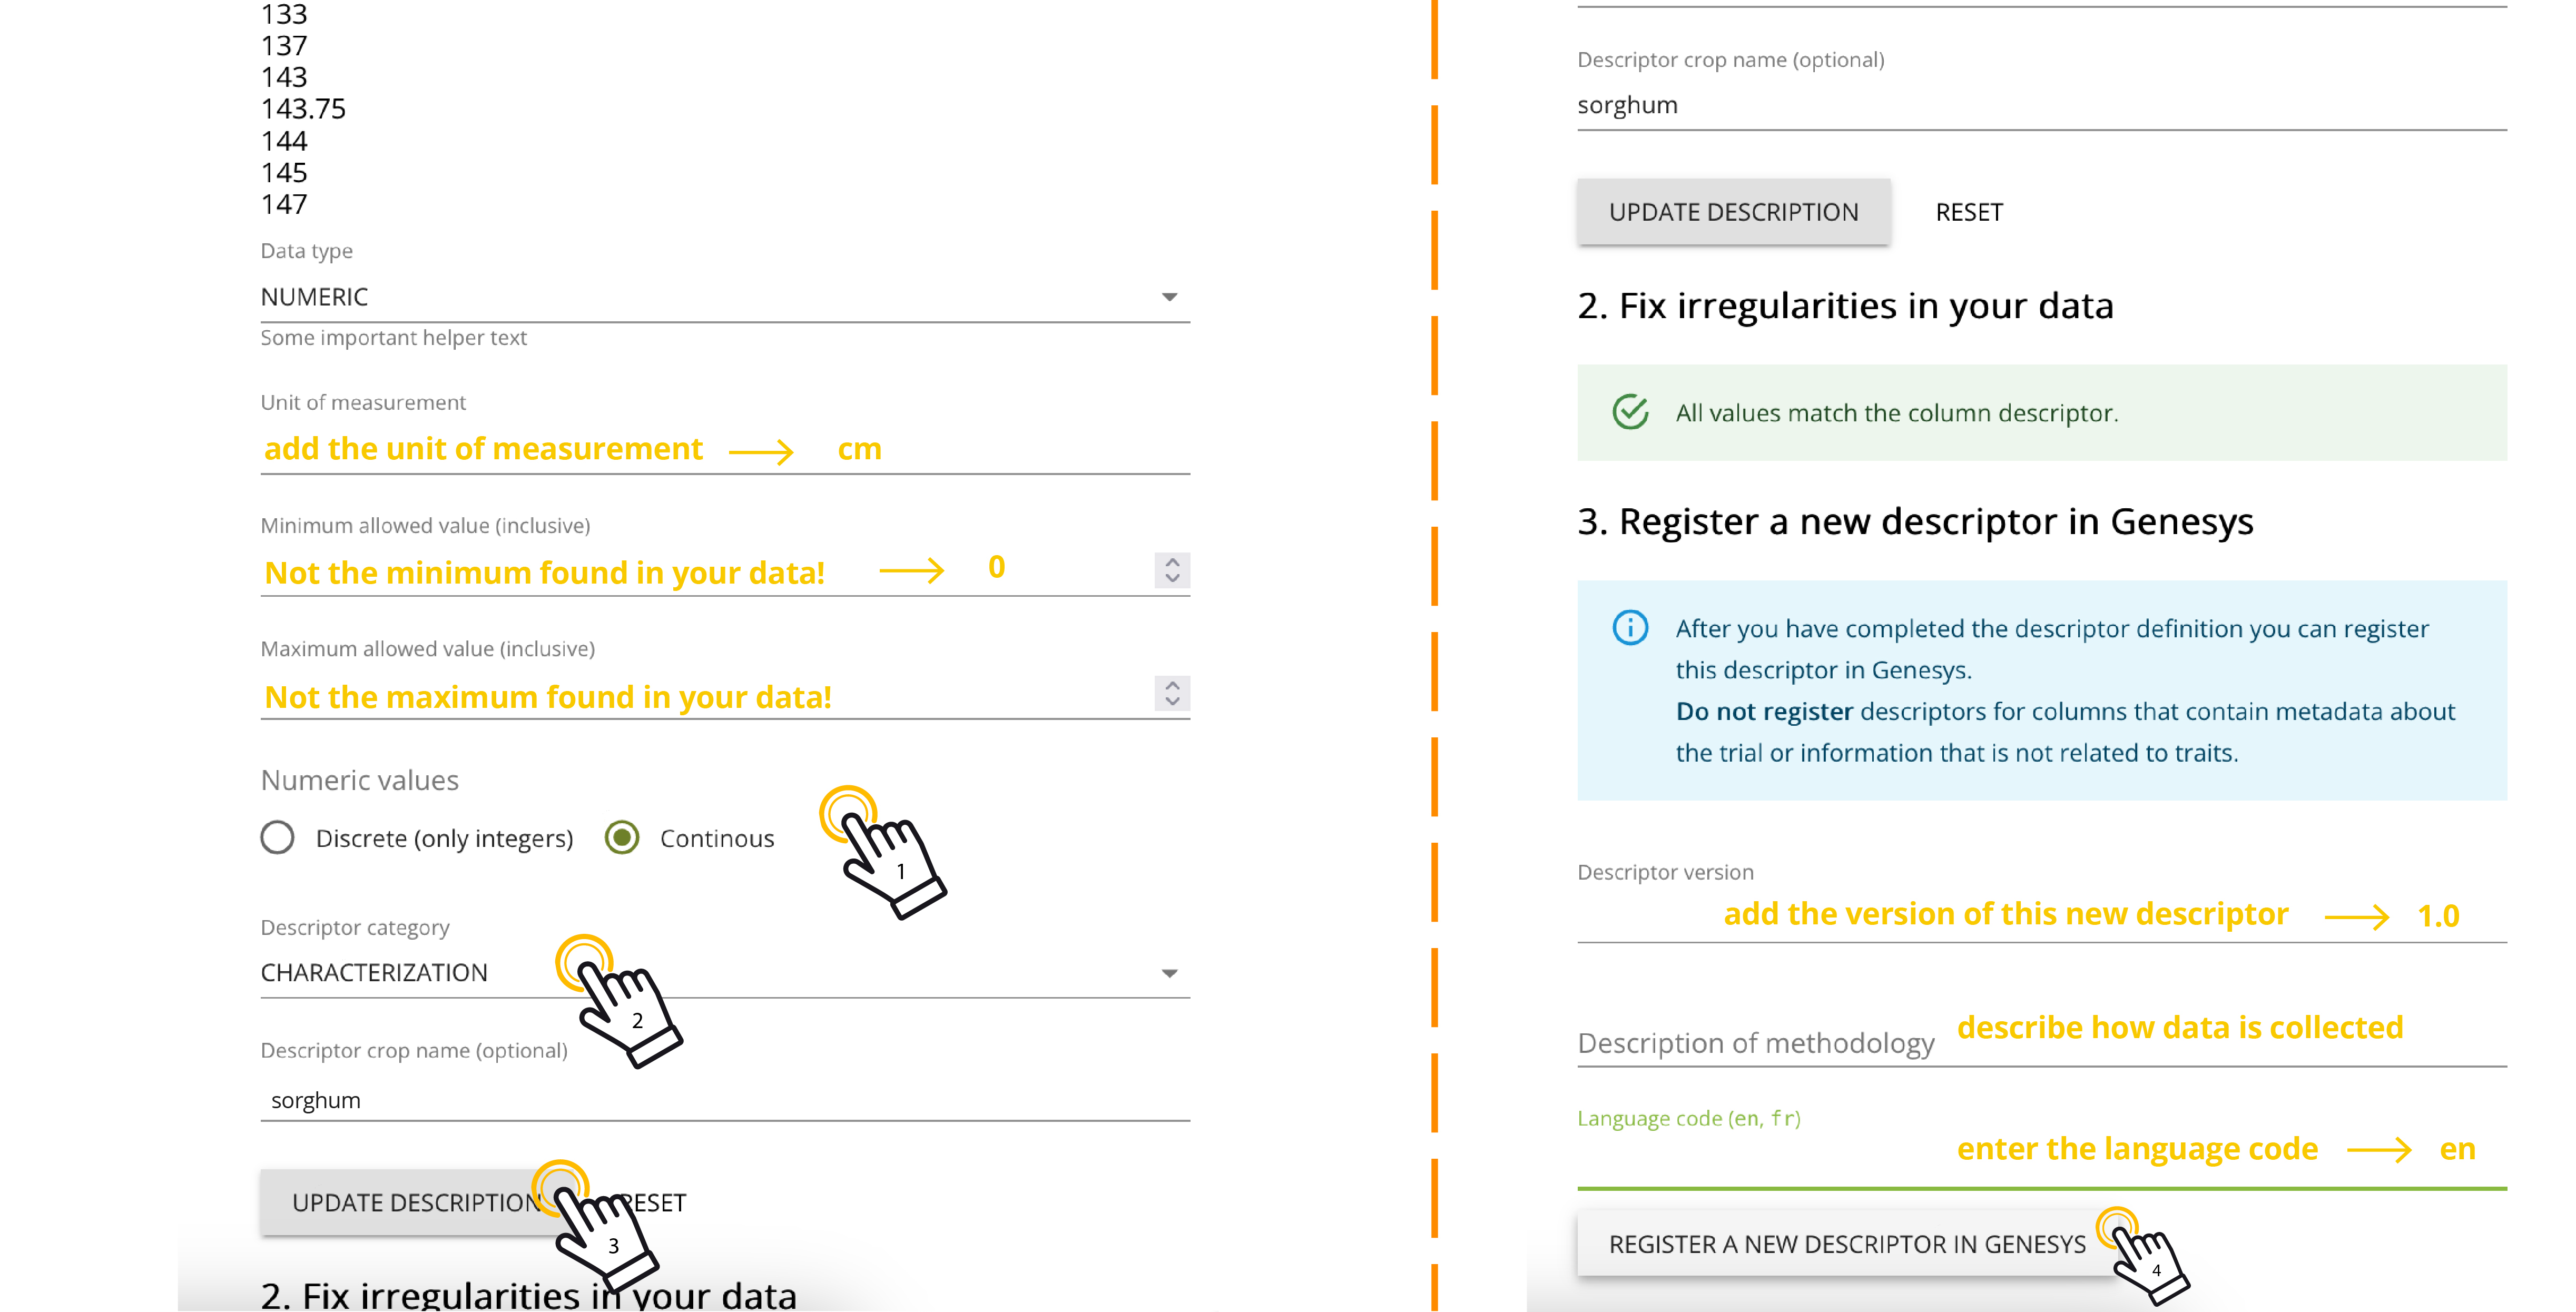 Figure 13: Update new descriptor and register observations
Step 2.4: Preview mapped data
- View Dataset: Use the preview function by clicking the "View Dataset" button to see how the mapped data will appear to users. Make sure all descriptors are correctly linked and data is displayed as expected.
- Test Filters: In the preview, use the filtering options to test the usability of the dataset. This helps make sure users can effectively query and interact with the data once it is published.
This step is demonstrated in figure 11 above. We advise you to continually preview the mapped data and make necessary edits to descriptors or data entries to ensure data integrity and accuracy.
Step 3: Review the list of accessions
After mapping your data and linking descriptors, the next step is to review the list of accessions. This makes sure that all accessions in your dataset are correctly linked to their corresponding records in Genesys.
The system displays a list of all accessions included in your uploaded dataset. Each accession should have a link to its passport data in Genesys, indicated by blue hyperlinks. Unlinked accessions are shown in black text without hyperlinks.
- Check for links: Scroll through the list to make sure that each accession number has a corresponding hyperlink to its passport data. Blue hyperlinks indicate successful mapping to existing records in Genesys.
- Identify issues: Look for any accessions that are not linked. These are displayed without hyperlinks and in black text. Common issues include incorrect accession numbers, missing genus information, or records that do not exist in Genesys.
- Correct errors: If errors are found, you have two main options:
- The Rematch Accessions button attempts to rematch accessions to correct minor issues. This button is useful when you have uploaded trait data and later updated the passport data before publishing the trait dataset.
- Clear List: If significant errors are present, you may choose to clear the list and re-upload a corrected file.
Suppose you have 194 accessions in your Excel file, but only 191 are linked. Three accessions are not linked, likely because they have incorrect genus names or are missing from Genesys. Correct the errors in your passport data, then return to Step 3 and use the "Rematch Accessions" feature to refresh the links.
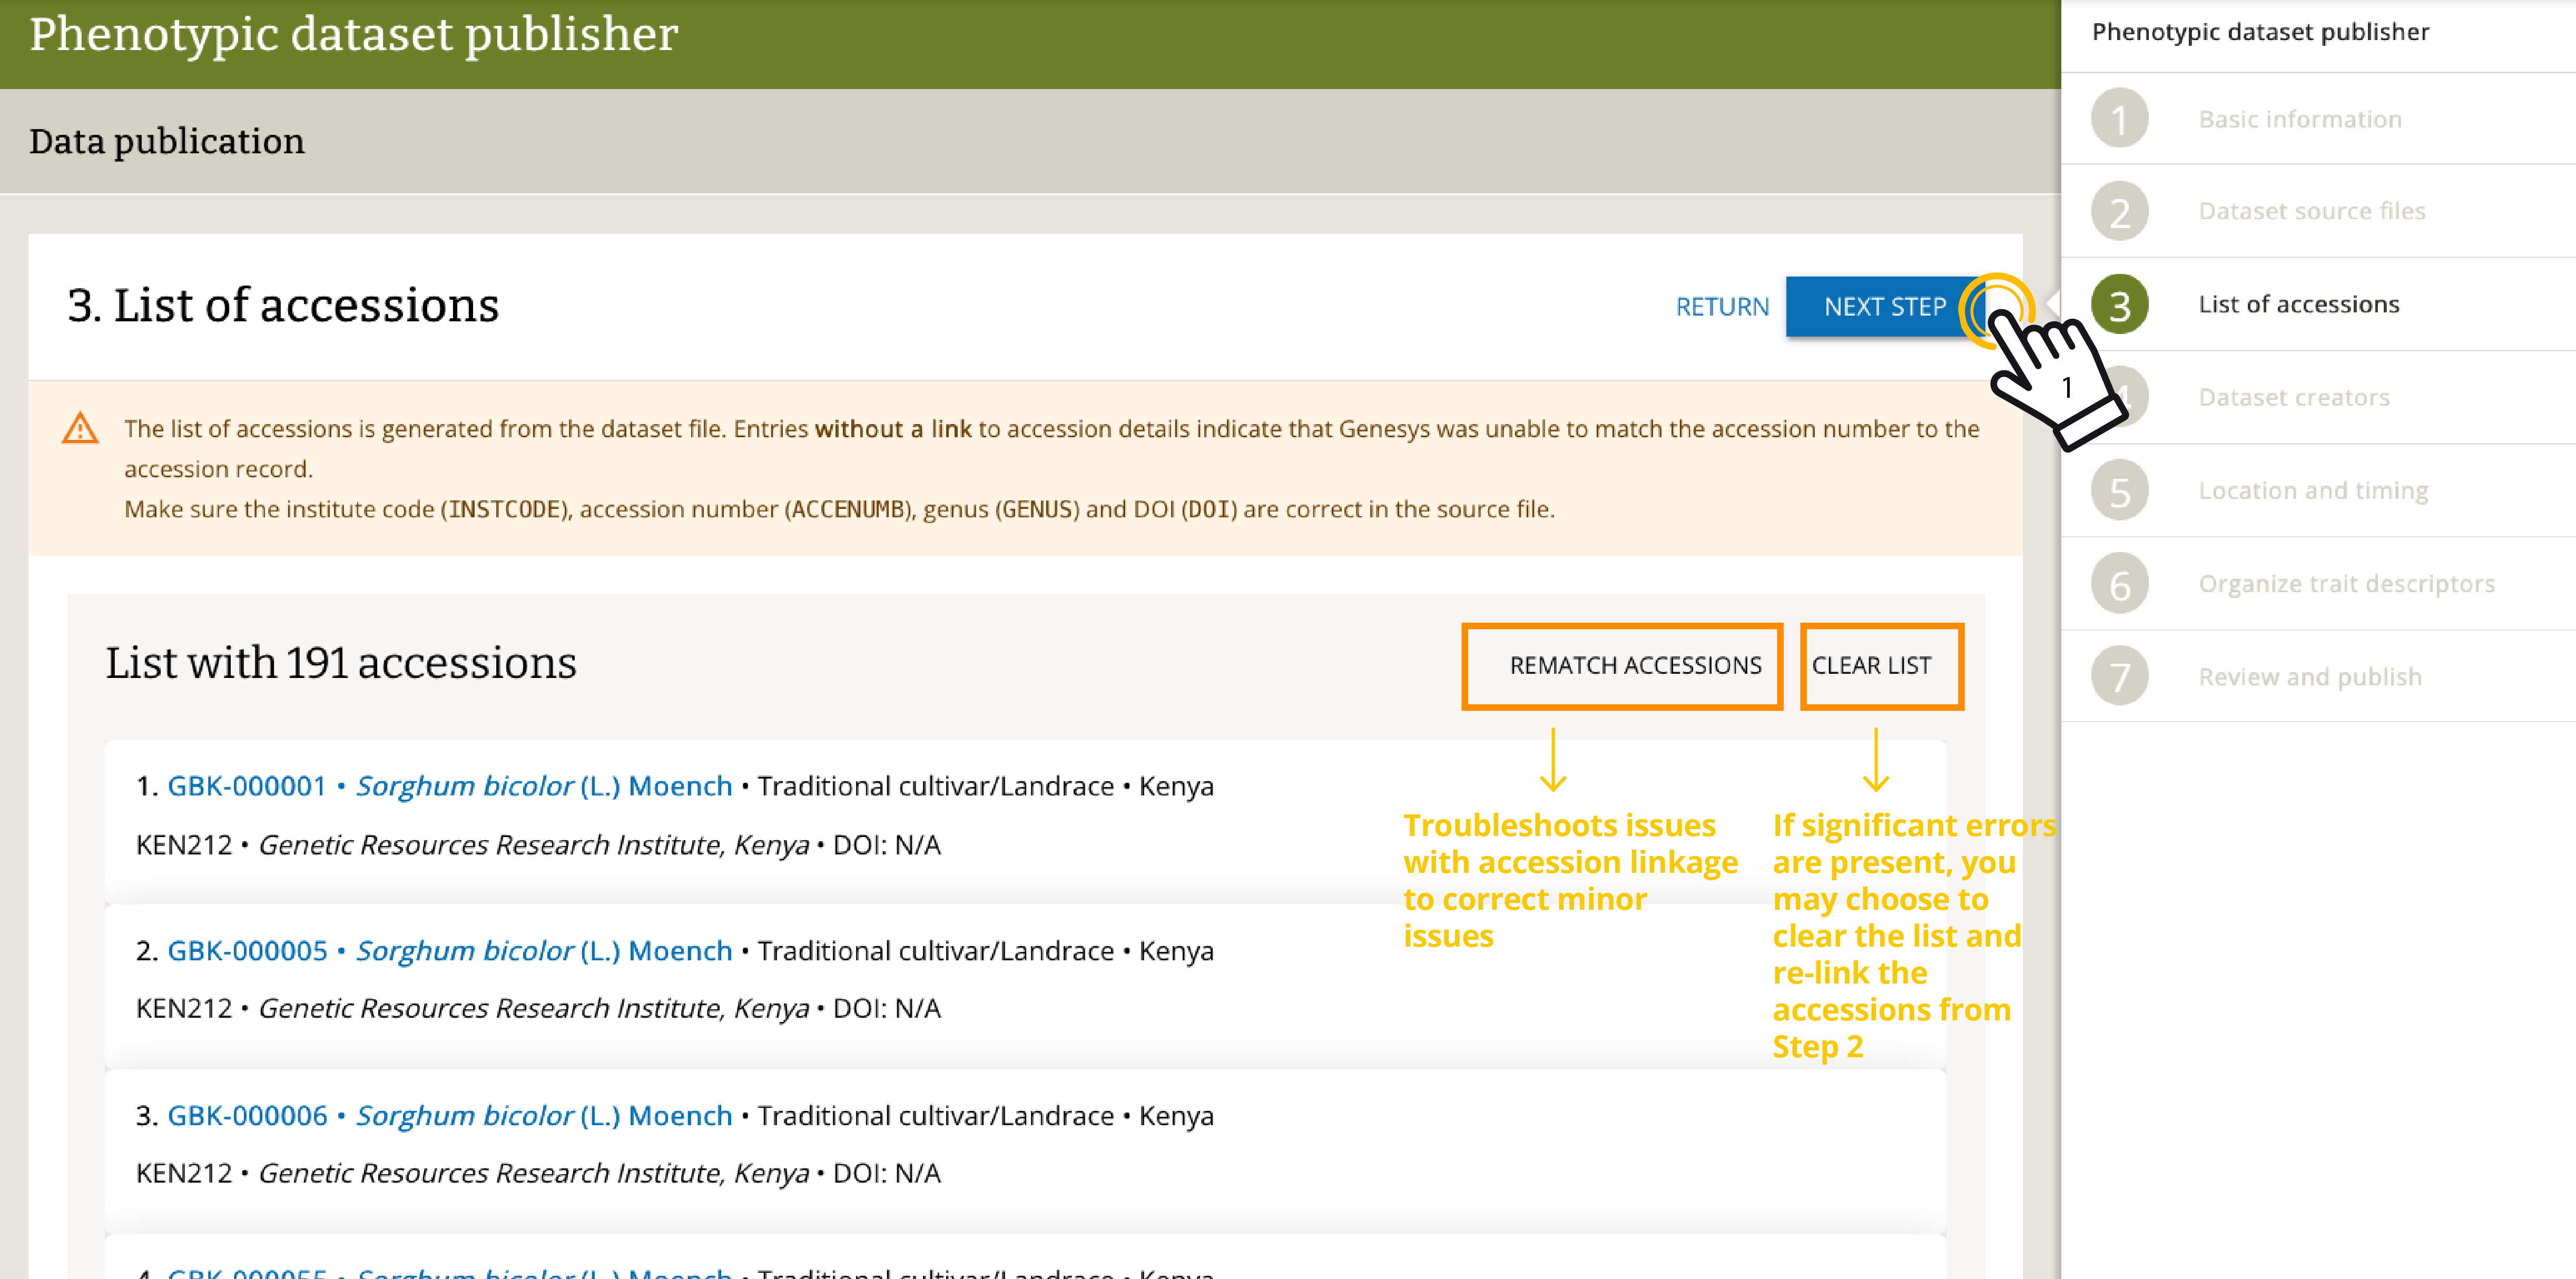 Figure 14: Review the list of accessions
Step 4: Add dataset creators
In this step, you add and credit the individuals who contributed to the creation and management of the dataset. This includes roles such as data managers, collectors, digitizers, and curators. If the dataset was a collaborative effort with multiple institutions, make sure all contributors are credited. Always obtain consent before sharing personal contact details. Note that roles can vary for different datasets.
- Full Name: Enter the full name of the dataset creator.
- Role: Select the appropriate role from the list:
- Data Manager: Responsible for overseeing data collection and management.
- Data Collector: The person who collected the data in the field.
- Data Digitizer: The individual who transferred the data from paper to digital format.
- Data Curator: The person who organized, validated, and ensured the quality of the data.
- Institutional Affiliation:
- Institutional Name: Enter the full name of the institution, not the institute code.
- Optional details: Include email address, phone number, fax, and address. Make sure you have consent to share personal information.
Add multiple creators: Repeat the process to add more creators if necessary, making sure that each person role and affiliation are accurately recorded.
Delete creators: Click the trash can icon to remove a dataset creator entry.
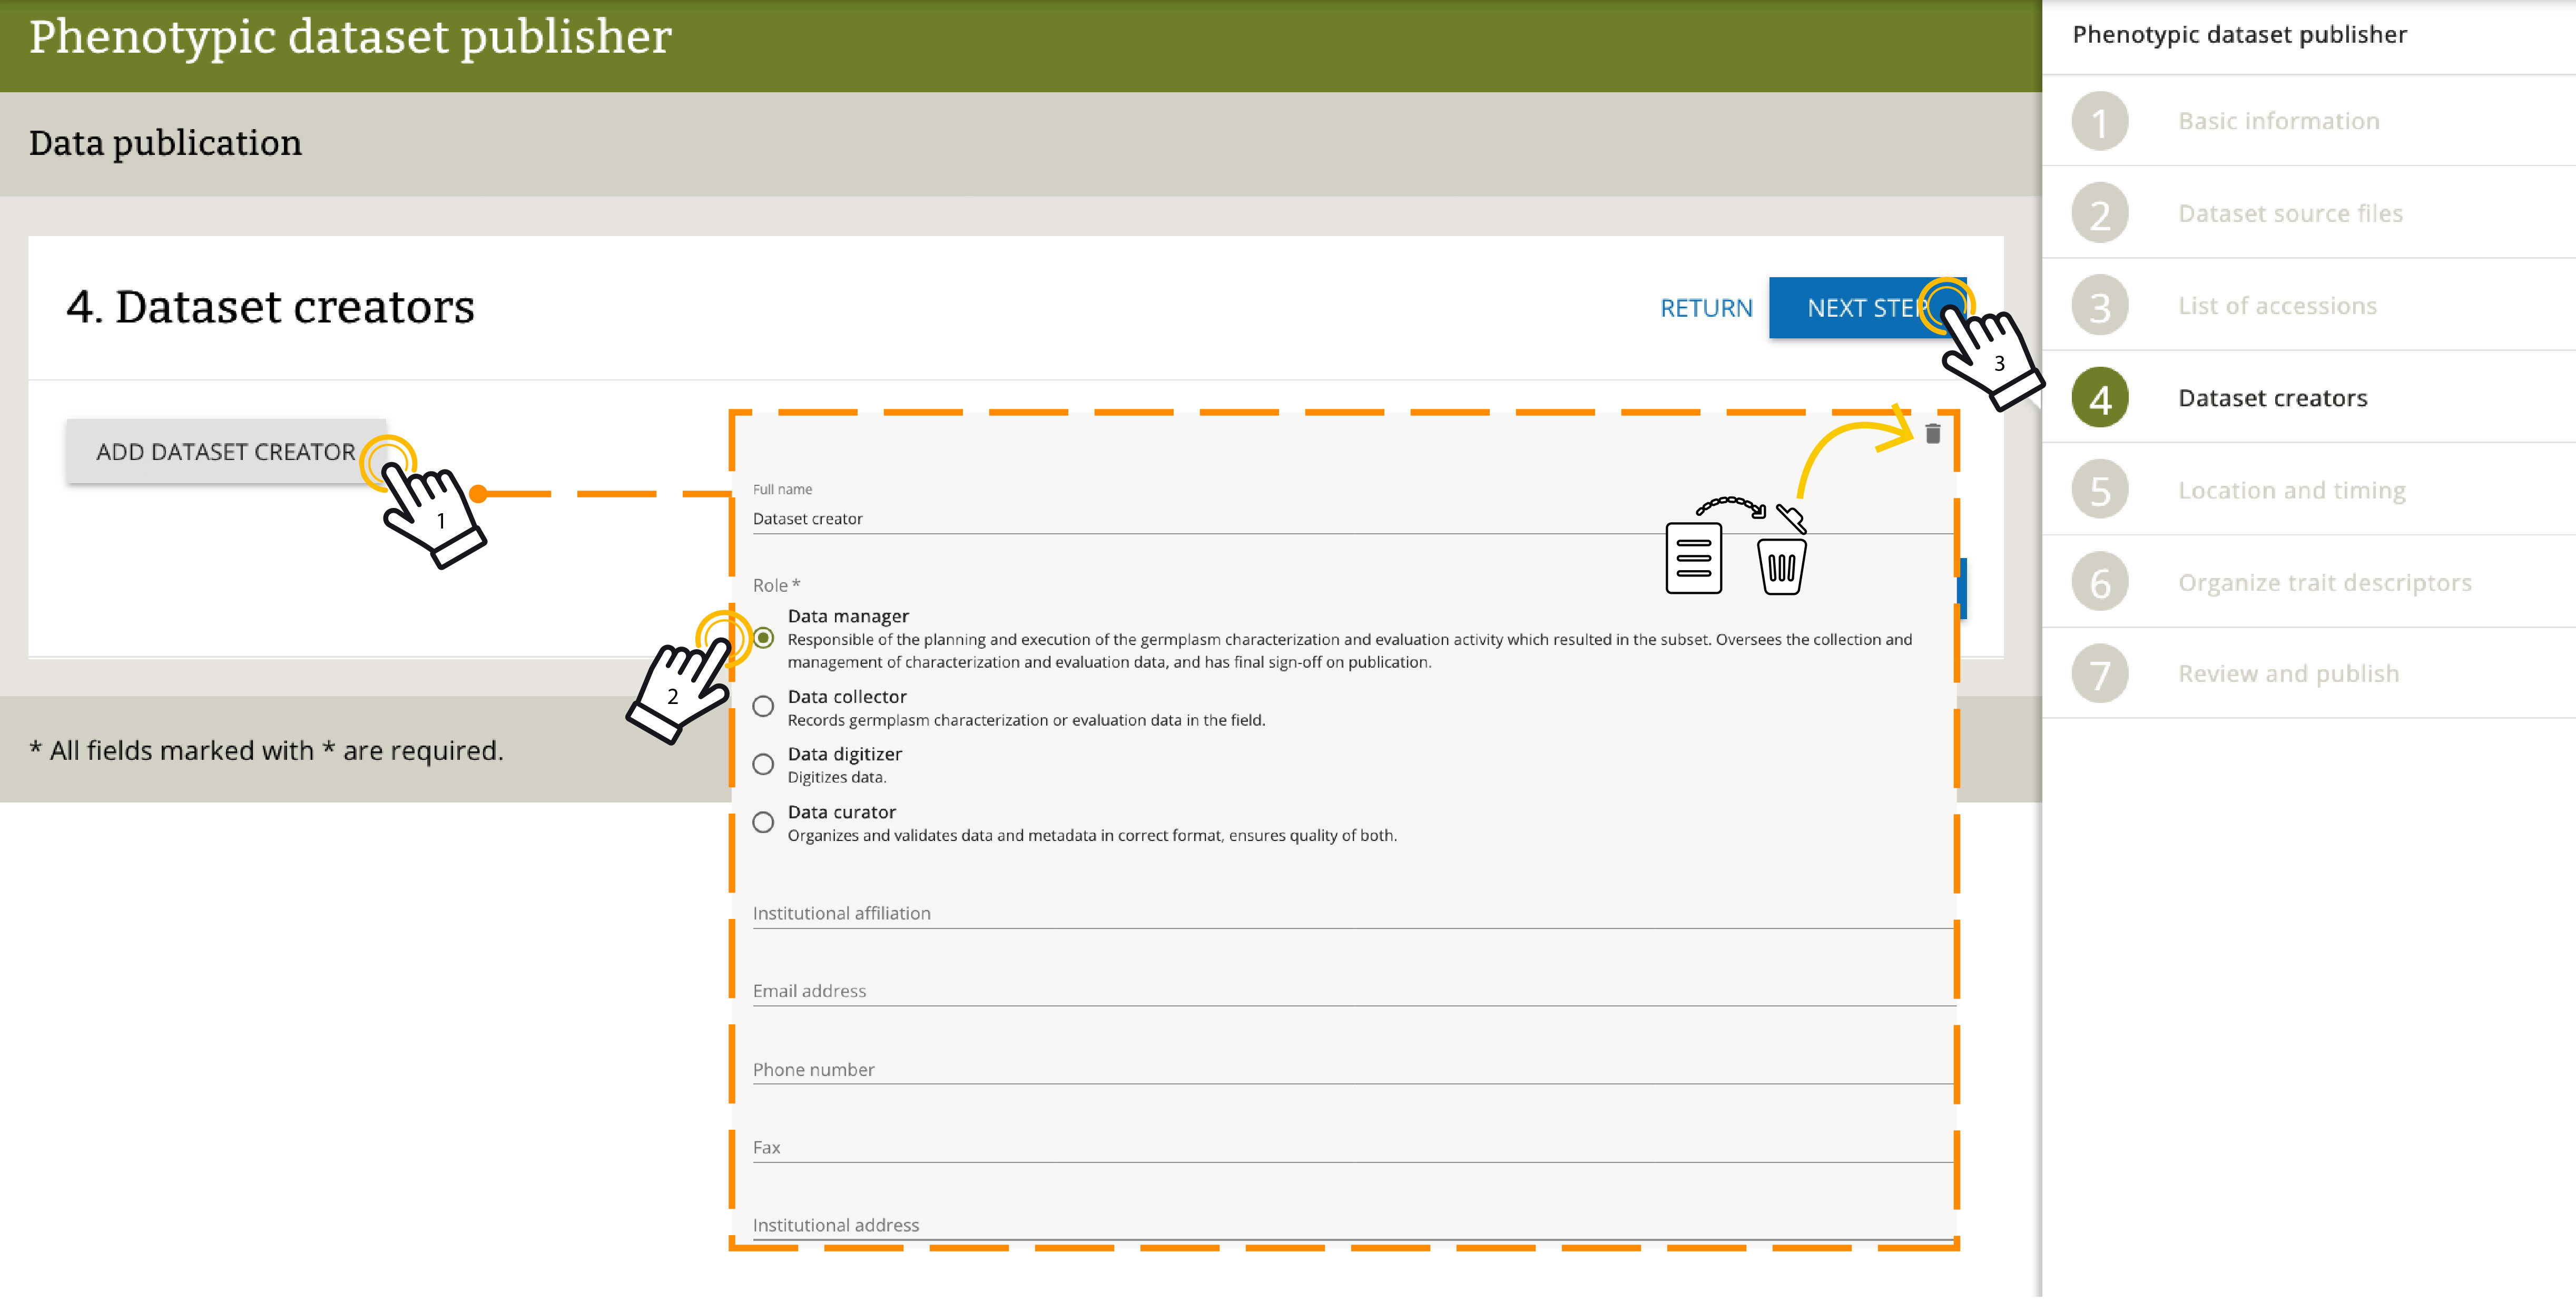 Figure 15: Add dataset creators
Step 5: Location and timing
In this step, you specify the geographical locations and time frames where the trait data was collected. This metadata provides important context for the data and helps make it more useful for other users.
- Open Location and Timing section: Click "Add Location" to enter the details.
- Enter location details:
- ISO Country Code: Enter the three-letter country code (for example, KEN for Kenya), then select the option from the drop-down menu.
- Country Name: Type the full name of the country, then select the option from the drop-down menu.
- State/Province: Enter the state or province name if applicable.
- Locality: Specify the locality or region.
- Latitude and Longitude: Provide decimal degrees for precise location. This is optional but recommended for accuracy.
- Enter timing details:
- Starting Date: Format as YYYY-MM-DD. If the exact day is unknown, use YYYY-MM-00.
- Ending Date: Format as YYYY-MM-DD. If the exact day is unknown, use YYYY-MM-00.
- Environment Description: Provide a general description of the environment and conditions during data collection, such as climate or soil type.
- Save and continue: Review all entries for accuracy and proceed to the next step.
Add multiple locations and times: Add more locations and time frames if the data was collected at different sites or during different periods.
Delete locations and times: Click the trash can icon to remove a Location and Time entry.
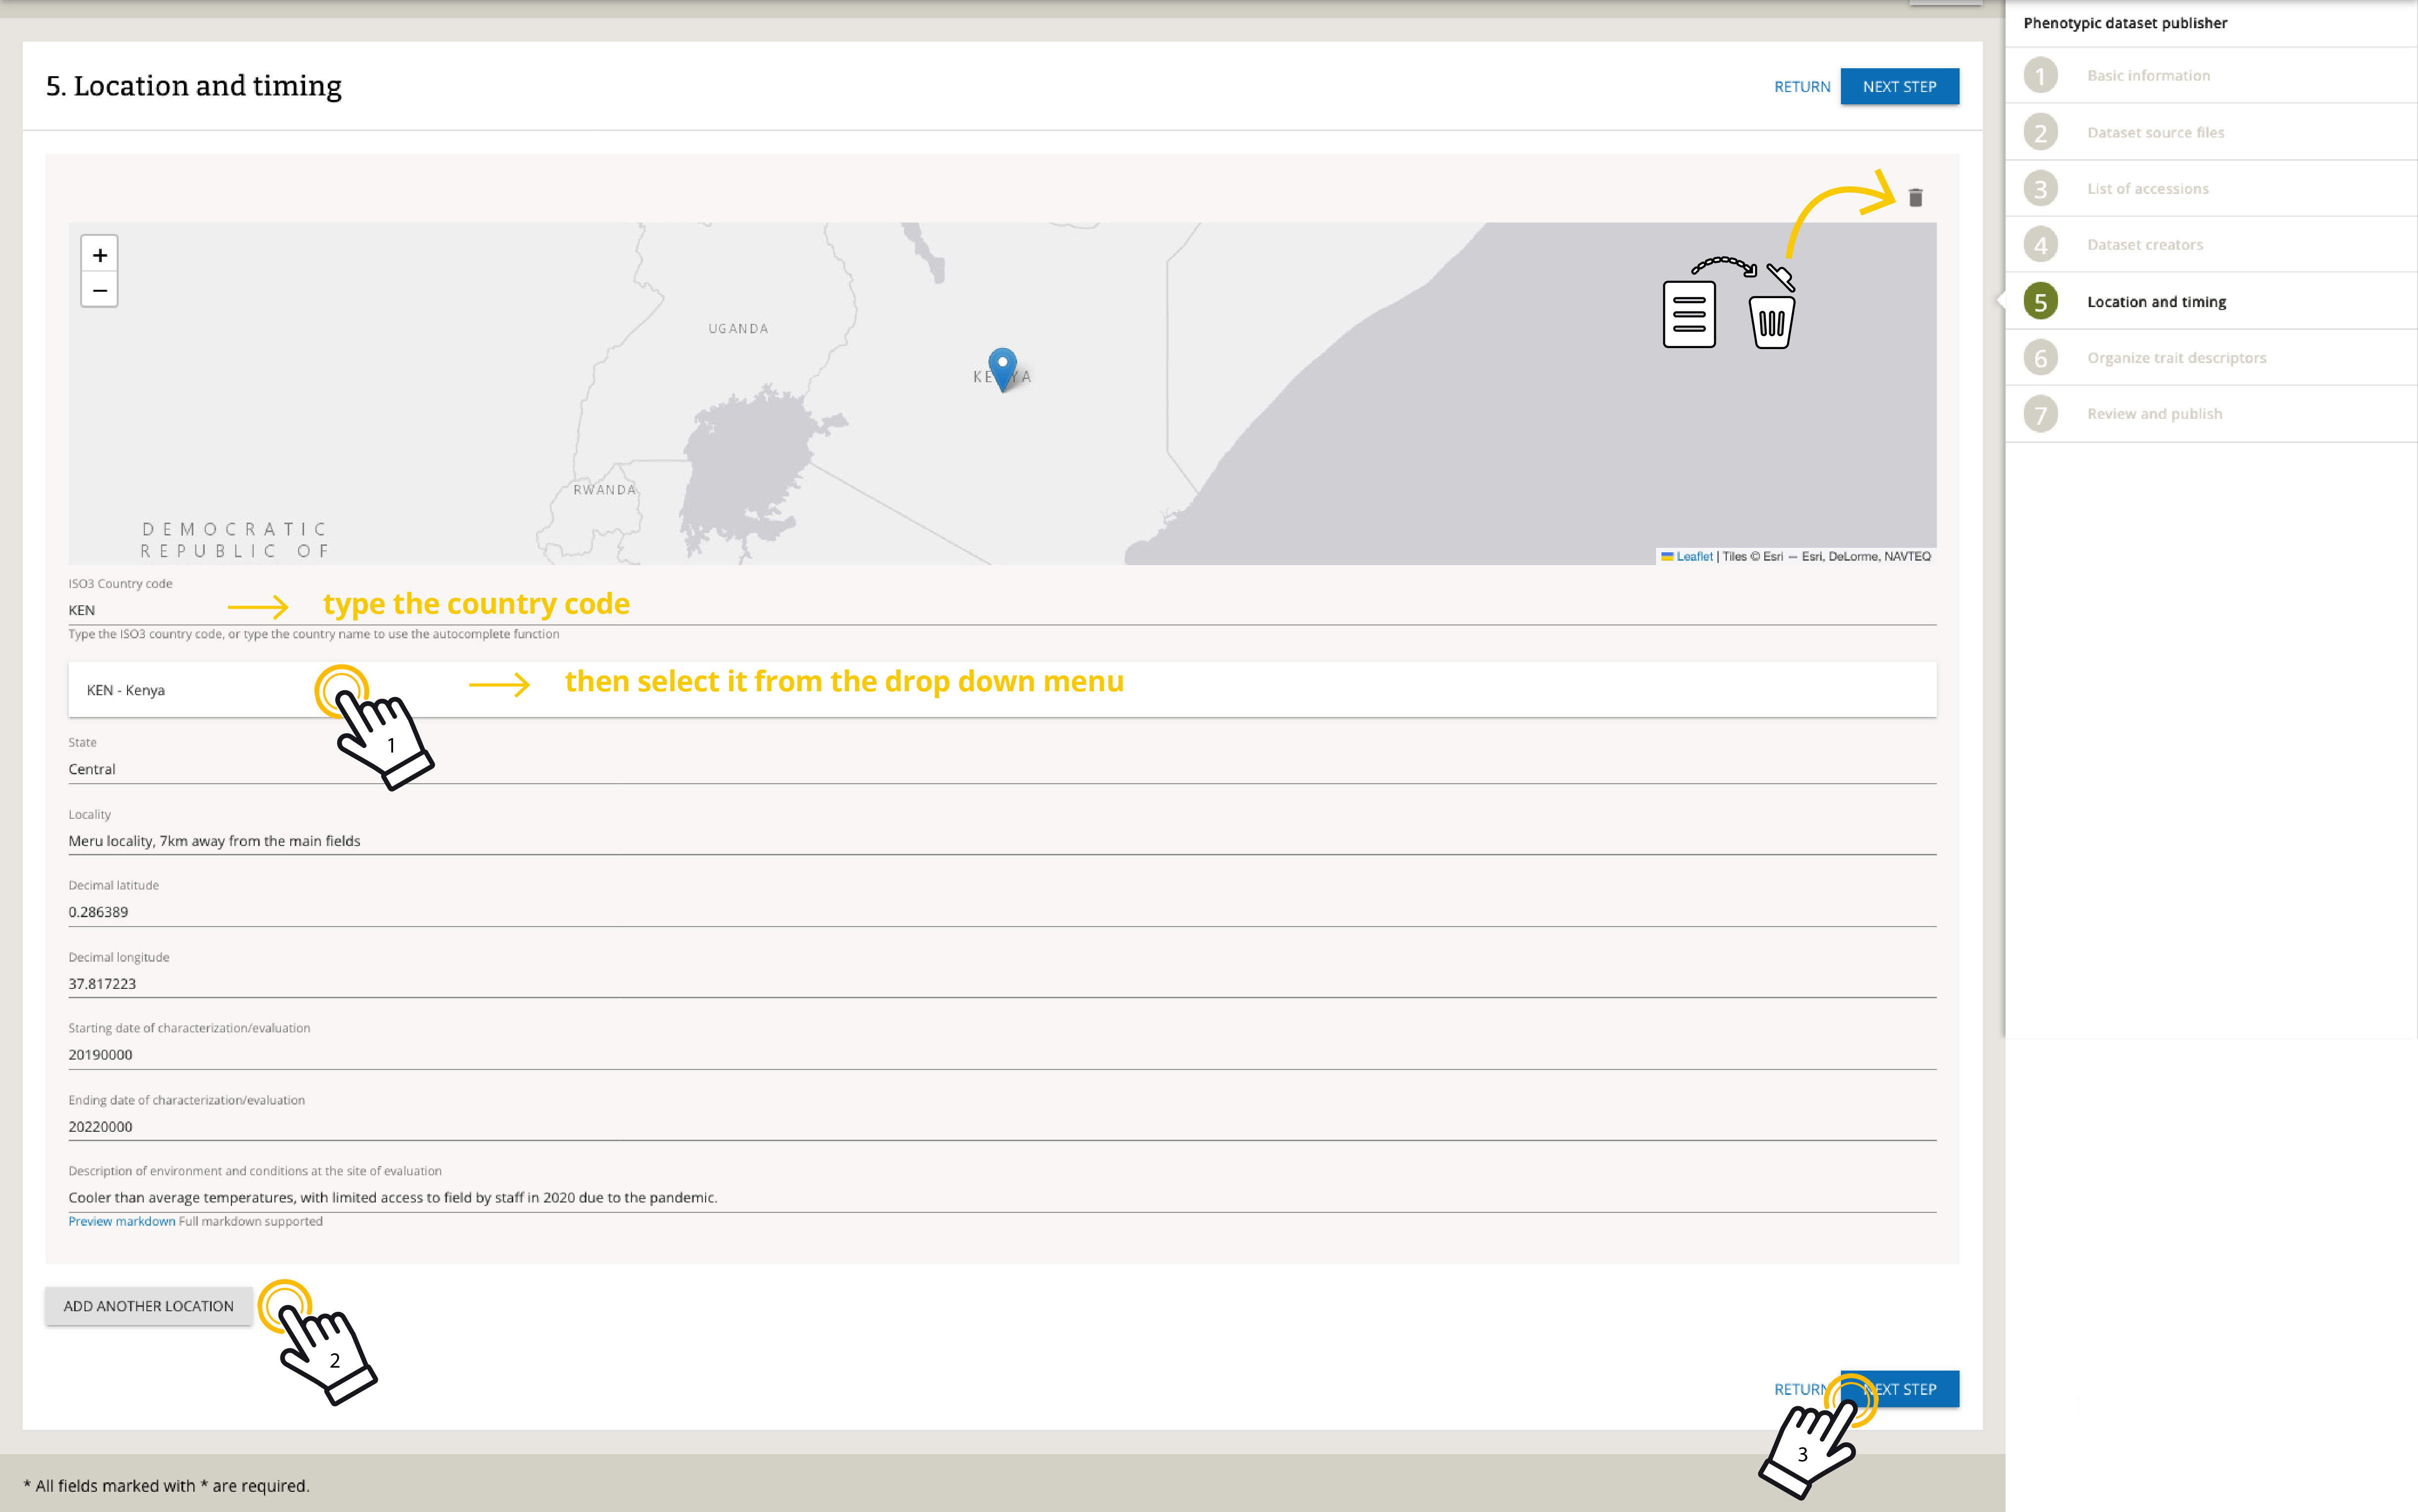 Figure 16: Add locations and timings
Step 6: Organise descriptors
In this step, you arrange the trait descriptors for your dataset. Proper organisation makes sure that the data is presented in a logical and user-friendly manner. We recommend that you use this step to also check for the proper spelling and title capitalisation of your descriptors: first letter in capital and the rest in lower case.
- Reorder descriptors: Click and drag descriptors to rearrange their order. This is useful if certain traits should be grouped or prioritised.
- Review unmapped descriptors: Click the "Check for Unmapped Descriptors" button to refresh the list. Review these descriptors to decide if any should be included. If so, return to Step 2 to map them appropriately.
- Delete descriptors: Click the trash can icon to remove a descriptor from the list. This means the column and its associated data will not be included in the trait dataset. If you accidentally remove descriptors, return to Step 2 to re-map them appropriately.
Tips for organising descriptors:
- Group similar traits: Place related traits together, such as all morphological traits followed by all agronomic traits.
- Prioritise important traits: List the most critical traits for your research or user needs at the top.
- Logical flow: Arrange traits in a sequence that reflects the growth or developmental stages of the plant, if applicable.
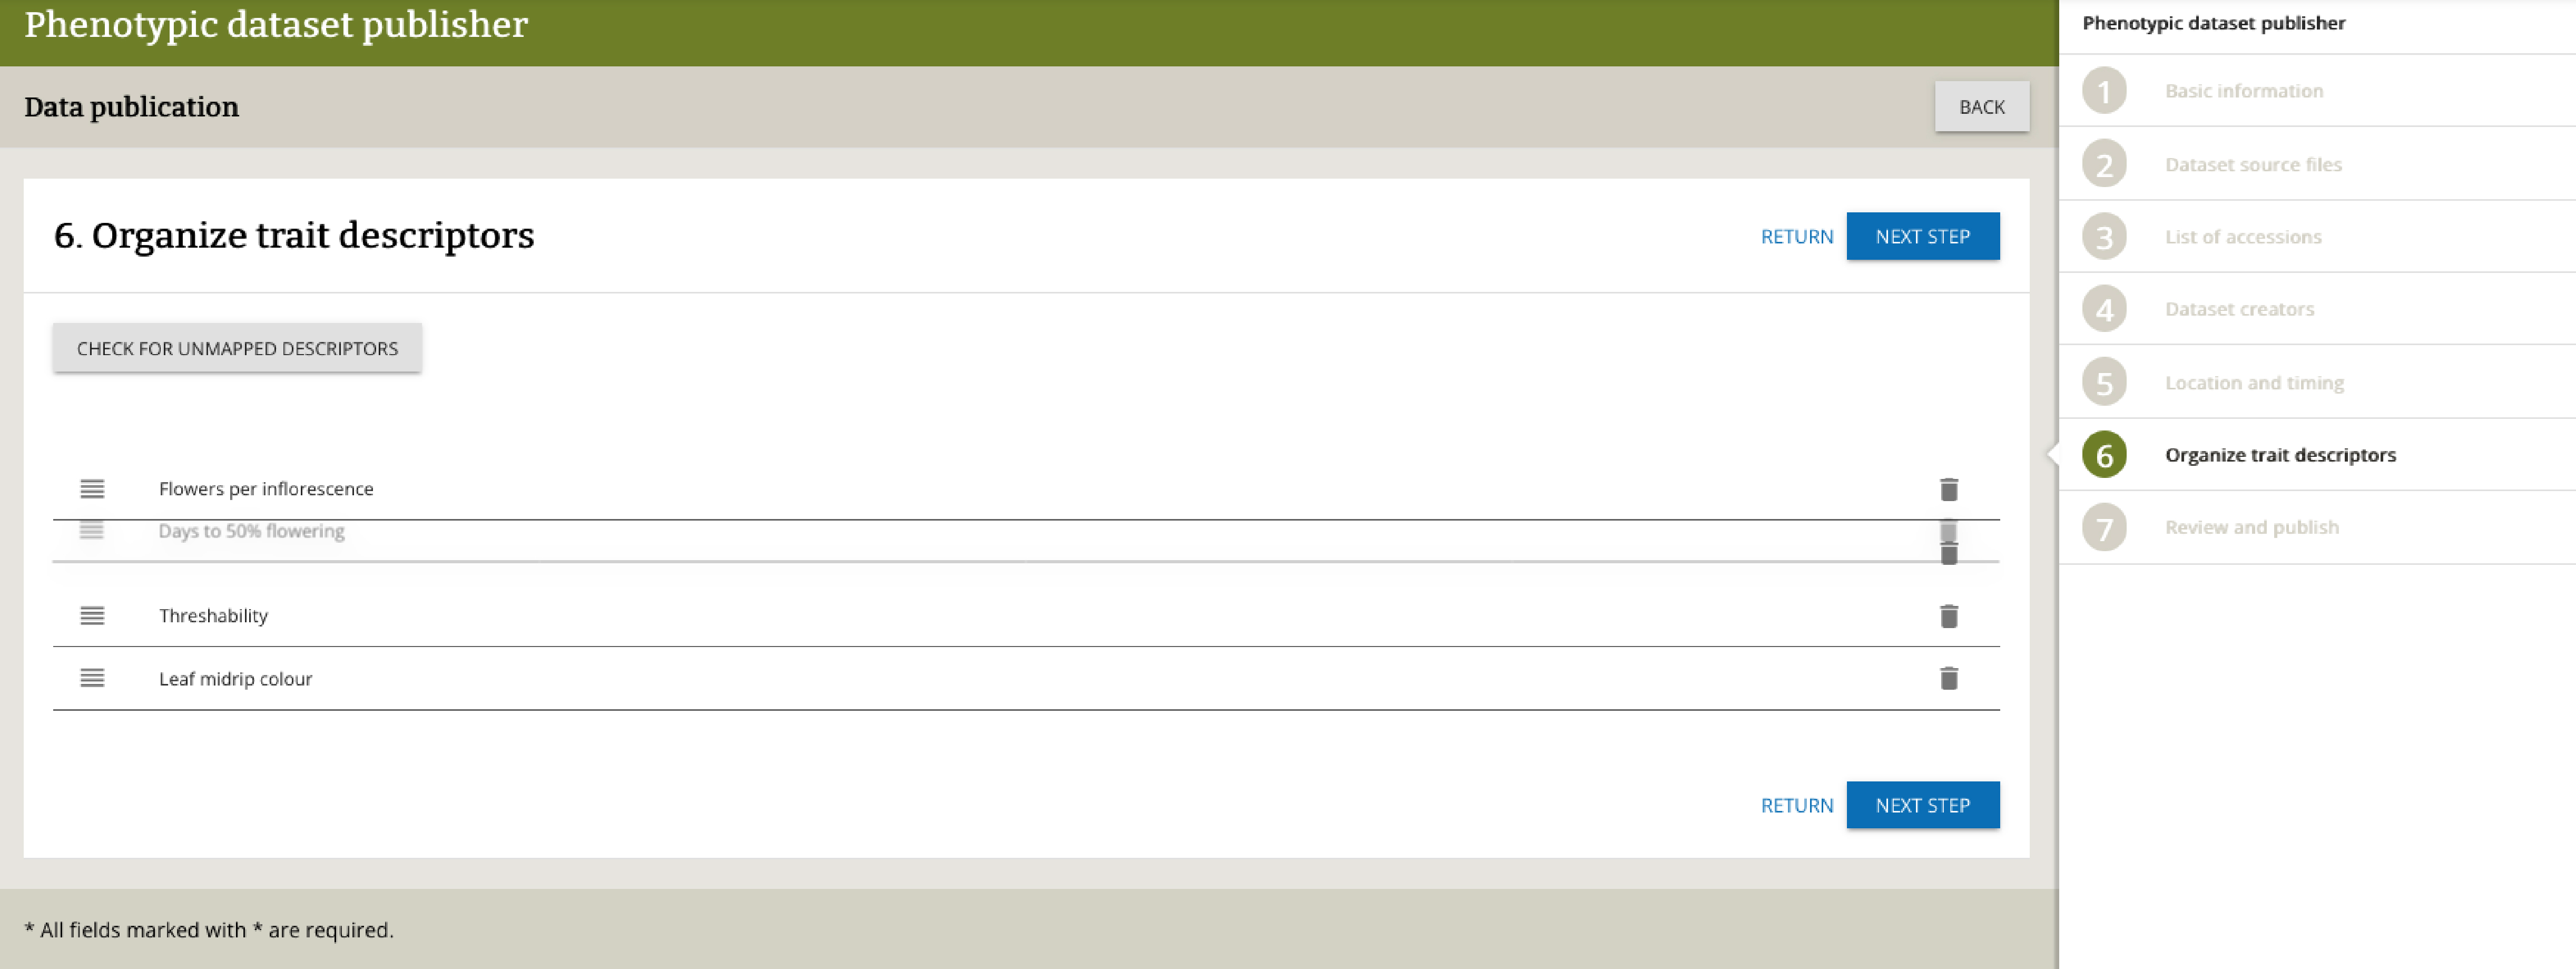 Figure 17: Organise trait descriptors
Step 7: Review and publish
In this step, you perform a final check of your dataset before submitting it for publication on Genesys. Review the dataset details, verify that all descriptors are accurately mapped and organised, and confirm the roles and affiliations of all dataset creators. Additionally, make sure that all accessions are correctly linked to their corresponding passport data.
Once you are satisfied with the accuracy and completeness of the dataset, click "Send to Review" to submit it for publication. The Genesys team will review the dataset before making it publicly available, ensuring data integrity and usability.
By following these steps, you can successfully upload and integrate trait data into Genesys, making it accessible and searchable for the global research community. Experiment with the sandbox environment and refine your process before uploading to the live platform.
If you have any questions or need assistance with the new form, please do not hesitate to contact helpdesk@genesys-pgr.org.
Where to go next
- To learn more about the other types of data you can add beyond passport data, see Beyond passport data.
- To refresh your memory on uploading the foundational passport data, see Uploading passport data.
- For questions or problems, see How to get help.