Uploading images and documents via FTP
Images and documents bring accessions to life on Genesys. A photograph of a plant in the field or in the genebank helps users visualise the material before requesting it. Documents such as MTA templates or field trial reports give important practical context.
The primary method for uploading images and documents is through the Genesys FTP server. The connection settings are listed below. Your FTP username is the same as your Genesys username (your email address), but the FTP password is a separate password that you generate yourself.
Preparing images for upload
Make a folder YOUR_INSTCODE on your local computer to hold files to be published on Genesys. Create a subfolder acn. Within the acn folder, create a folder using the accession number (ACCENUMB) as the folder name. This folder holds all files for a single accession.
Your folder structure should look like this (example for PHL001):
PHL001/acn/
PHL001/acn/IRGC 1/image1.jpg
PHL001/acn/IRGC 1/image2.jpg
PHL001/acn/IRGC 1/image3.jpg
PHL001/acn/IRGC 2/image1.jpg
Filenames are not important, but they must be unique within each accession folder.
Getting an FTP password
Log in to Genesys and click My Profile in the user menu. If your account is trusted, you will see a button Generate FTP password. This creates a dedicated password for FileZilla and other FTP clients. It is separate from your Genesys login password, which is useful if you sign in with Google and do not have a traditional password.
The FTP password is shown only once when generated, so copy it somewhere safe.
If you have trouble generating your FTP password, contact helpdesk@genesys-pgr.org.
Connecting with an FTP client
An FTP client that supports SFTP connections is required. FileZilla is commonly used to connect to the Genesys FTP service.
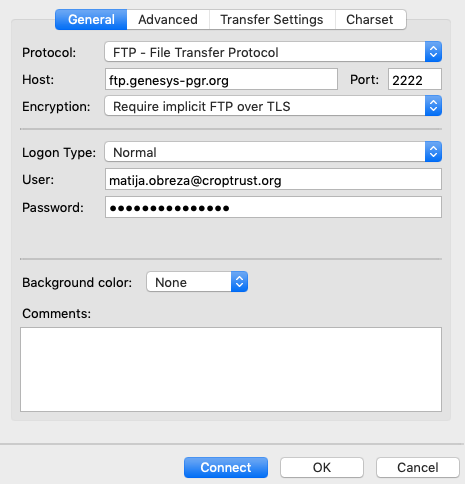
Use the following settings for Sandbox (testing environment):
| Field name | Description |
|---|---|
| Host | ftp.sandbox.genesys-pgr.org |
| Port | 2223 |
| Protocol | FTP |
| Encryption | Require implicit FTP over TLS |
| Logon type | Normal |
| Username | Your sandbox Genesys username (email address) |
| Password | The generated FTP password |
Use the following settings for Production (live portal):
| Field name | Description |
|---|---|
| Host | ftp.genesys-pgr.org |
| Port | 2222 |
| Protocol | FTP |
| Encryption | Require implicit FTP over TLS |
| Logon type | Normal |
| Username | Your production Genesys username (email address) |
| Password | The generated FTP password |
Uploading process
Connect to the Genesys FTP server and navigate to the folder /wiews/YOUR_INSTCODE. Then synchronise the acn directory from your local computer with the remote FTP server.
Checking that images appear
After uploading, open the details page for one of the accessions where you uploaded images. The gallery should display within a few minutes.
For a visual walkthrough, see:
GGCE image sync
If your genebank uses GRIN-Global Community Edition (GGCE), images stored within GGCE can be synchronised directly with Genesys through the GGCE configuration. This keeps your portal images in step with your GGCE records automatically, without needing to manually upload via FTP.
See the GGCE documentation for configuration details.
Where to go next
- To learn about other data types you can publish, see Beyond passport data.
- To refresh your memory on uploading passport data, see Uploading passport data.
- For questions or problems, see How to get help.