Procedure to join Genesys
If you're thinking about joining Genesys for your genebank, this section will guide you through the process, from creating your first account to becoming an active data provider. This guide is intended for the person leading the effort, such as a curator, data manager, or director.
The process consists of seven steps. The initial steps are administrative and focus on the legal framework. The final steps involve preparing and publishing your data. Once live, ongoing maintenance is minimal (Frequency of data updates).
The 7-step path at a glance
| # | Step | Responsible party | Estimated effort |
|---|---|---|---|
| 1 | Register a Genesys user account | Anyone at your institute | 5 minutes |
| 2 | Contact the Genesys helpdesk | Onboarding lead | 1 message and a short intro call |
| 3 | Provide signatory details and receive draft DPA | Onboarding lead | Hours |
| 4 | Internal review and approval of the agreement | Authorized signatory and management | Days to weeks |
| 5 | Return signed agreement for countersignature | Authorized signatory | Days |
| 6 | Establish your genebank's presence in Genesys | Genesys team and onboarding lead | Days |
| 7 | Prepare and upload first passport data | Data manager(s) | Variable |
Each step is described in detail below.
Step 1: Register a user account
You can register a Genesys user account without prior arrangement with the Crop Trust. This account is used for both general browsing and data-provider functions once your institute is onboarded.
Use an institutional email address
Register with your official institutional email address (e.g., your.name@yourgenebank.org) rather than a personal address for two reasons:
- Account continuity. Institutional addresses persist, ensuring data-provider accounts remain functional after staff changes or role transitions.
- Identity verification. The Genesys team uses your institutional domain to verify your identity. An
@worldveg.orgaddress simplifies onboarding compared to a@gmail.comaddress.
How to register: step by step
The registration process involves five short steps.
-
Open the registration form. On the Genesys home page, click Login at the top right, then select Login from the dropdown. On the login screen, click Create an account.
-
Fill in your account details. On the "Register a new account" form, enter your institutional email address, choose and confirm a strong password, and enter your full name.
-
Complete the human-verification check. Tick the I am human checkbox in the hCaptcha widget and complete any requested visual tasks.
-
Submit and verify your email. Click REGISTER. Genesys will send a confirmation email from the Genesys Helpdesk (helpdesk@genesys-pgr.org) with the subject "Verify your email address". Click the verification link in the email or copy the validation key.
-
Confirm the validation key. If using the link, you will be taken to a "Validate your email" page with the key pre-filled. Confirm the key matches the email and click CONFIRM.
You can now log in using your email and password.
Registering via Google
Genesys supports sign-in using a Google account via the Sign in with Google option. If your institution uses Google Workspace, use your institutional Google account rather than a personal Gmail account.
Click Sign in with Google, authenticate with your institutional account, and grant Genesys permission. If your administrator has restricted third-party sign-in applications (OAuth), you may receive an error. In this case, request access from your administrator or use email registration.
Managing your profile and resetting passwords
If you forget your password, click Forgot password on the login screen, enter your registered email, and follow the reset link sent to your inbox. The reset link is time-limited.
Once logged in, click the profile picture icon at the top right to access a menu for managing your account, including your Dashboard and profile settings (where you can update your display name, email, or password). For assistance, contact helpdesk@genesys-pgr.org.
Step 2: Contact the Genesys helpdesk
Once you have a user account, email the Genesys helpdesk to express your institute's interest in becoming a data provider. The helpdesk is the single entry point for onboarding:
Your first message should include:
- Your institute's full name and country
- Your FAO WIEWS institute code (
INSTCODE), if known (see Required Information) - A brief description of your collection: crops, approximate number of accessions, and where data is currently held
- Whether you intend to publish directly or via a network (e.g., EURISCO for European institutes)
- The name and role of the day-to-day Genesys point of contact
The Genesys team will typically suggest a short introductory call via Microsoft Teams or a similar platform. This call is informal and helps the Crop Trust understand your collection, organizational structure, and data state to prepare the necessary paperwork.
What to expect from the intro call
The team may ask about:
- Organizational structure. Who has the authority to sign legal agreements? This is usually the Director-General or equivalent, not the curator.
- The collection. The types of crops, scale, and distinctive features of the collection.
- Data state. Whether data is digitized (in databases, spreadsheets, or paper records) and its level of compliance with the Multi-Crop Passport Descriptor (MCPD) standard.
- Country-specific considerations. Whether ministerial approval is required before signing an external data-sharing agreement.
Step 3: Provide signatory details and receive the draft DPA
Following the intro call, the Crop Trust prepares a draft Data Provider Agreement (DPA). You will need to provide:
- The full registered name of the institute (and the genebank, if they differ)
- The registered institutional address
- The full name and position of the person authorized to sign the agreement
The signatory must have the authority to enter your institute into legal agreements, such as a Director-General, Rector, or Vice-Chancellor. The curator is typically not the authorized signatory. See Who Signs the DPA, on Whose Behalf for more details.
The Crop Trust will then send the drafted DPA for your review.
Use the legal-review window to start data work
While the DPA is under review, share a sample of your passport data confidentially with the Genesys team. They will provide feedback on MCPD compliance and identify potential issues, allowing you to prepare your data while the legal review process proceeds.
Step 4: Internal review and approval of the DPA
The DPA must be reviewed by your institution's authorized parties, such as legal counsel or the Director-General's office. The Genesys Data Provider Agreement section provides detailed information. Key points for reviewers include:
- It is a standard template. Substantive changes are generally not accepted, though exceptions may exist for genuine constraints (e.g., project-based datasets).
- It is non-financial. No money is exchanged.
- It is terminable. Either party may end the agreement with six months' written notice. Data is removed within three months of a formal written request.
Internal review may take days or weeks. We recommend starting this step early.
Step 5: Return the signed DPA
Once approved, your authorized signatory signs the DPA and returns it to the Crop Trust. The Crop Trust countersigns and sends you a fully executed copy.
Your institute is now formally a Genesys data provider. The Genesys team will typically:
- Publish a short announcement welcoming your genebank (with your permission and preferred phrasing)
- Begin the practical onboarding for Steps 6 and 7
Step 6: Establish your genebank's presence in Genesys
Your genebank's presence in Genesys consists of:
- An institutional page on the portal (for example, https://www.genesys-pgr.org/wiews/MLI002) containing your name, country, collection description, contact information, and a link to your website. The Genesys team manages the technical side; you manage the content.
- Data-provider permissions assigned to specific user accounts, enabling those users to upload data, edit the institutional page, and access the requests dashboard.
- A connection (if applicable) between your FAO WIEWS record and the corresponding Genesys profile to ensure alignment.
The Genesys team will ask you to confirm:
- Full institutional name and short name (acronym)
- Website URL
- Contact information (address and email)
- Your FAO
WIEWS INSTCODE(one institute may have several for regional collections) - The country or countries the collection covers
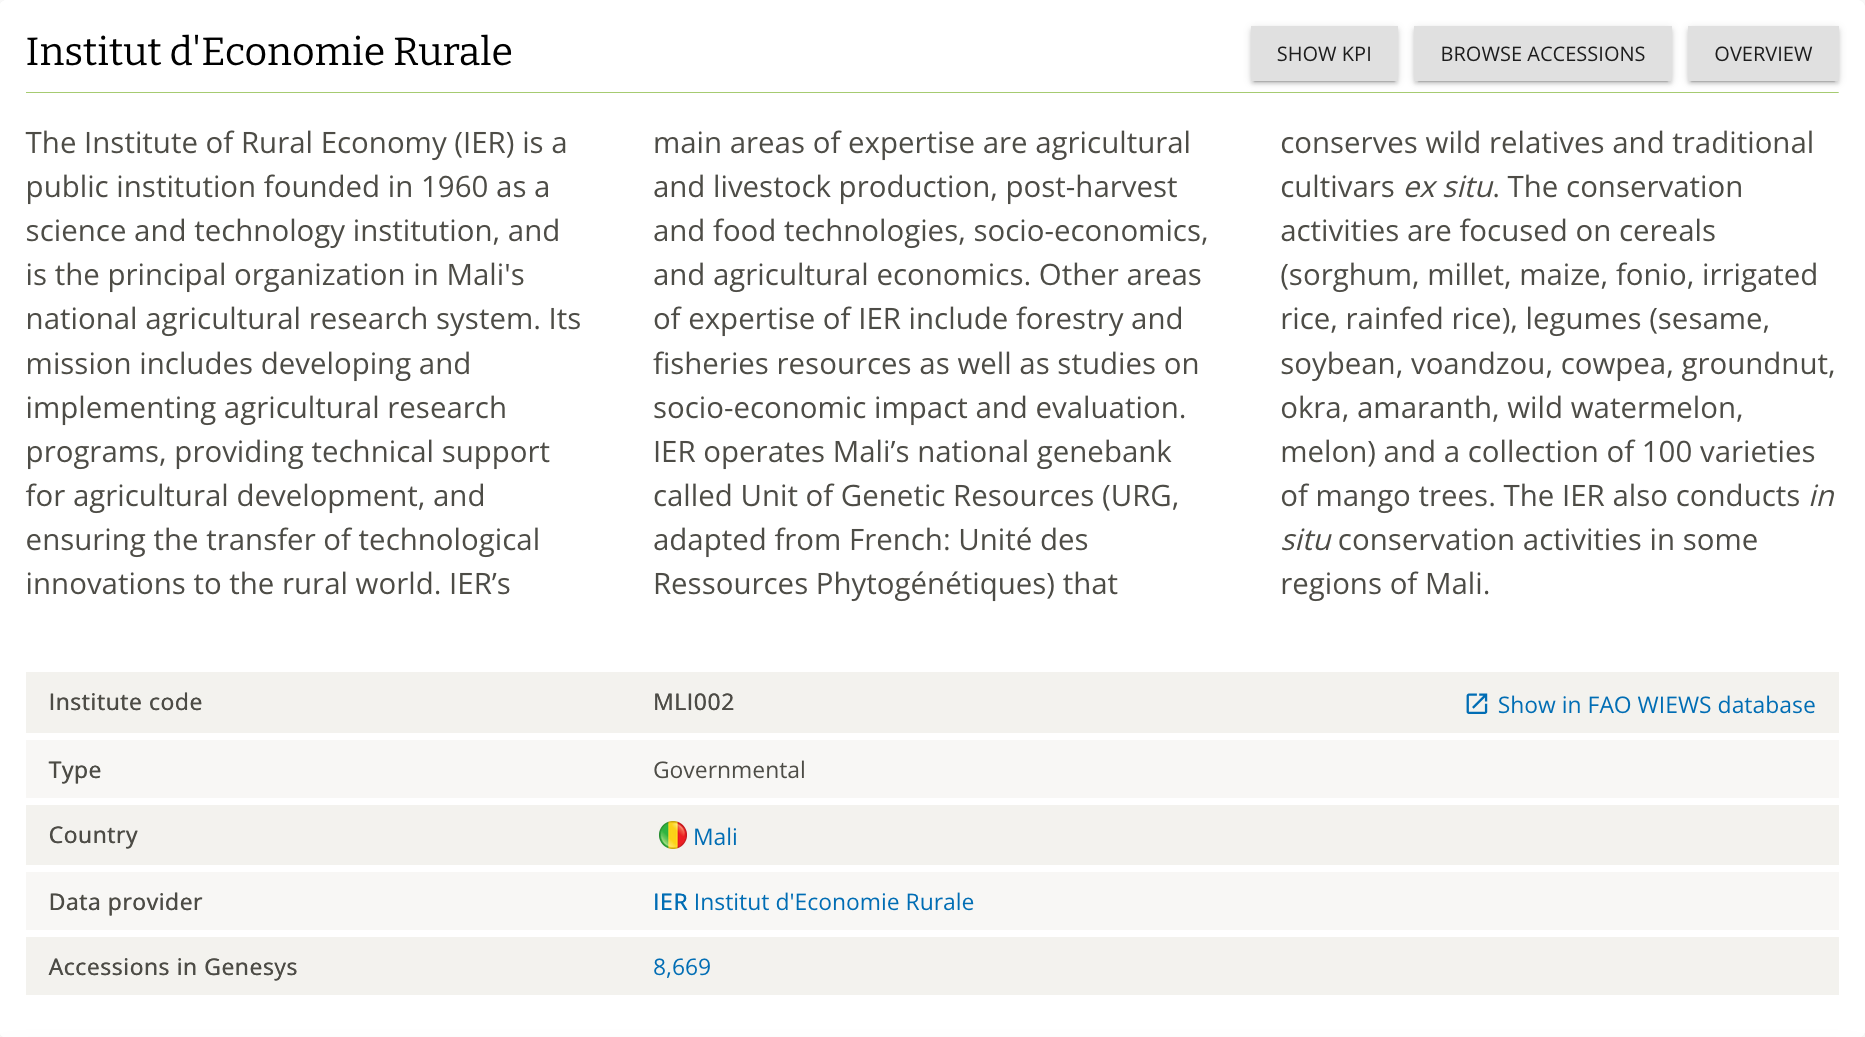
Some information is pulled automatically from FAO WIEWS, while other details are maintained directly in Genesys. See Managing your genebank profile and settings for a full explanation of which fields come from where and how to update them.
Requesting permissions on a genebank in Genesys
Once the profile exists, user accounts need permissions to act on its behalf. Common roles include uploading accession data, editing the institutional page, and viewing the requests dashboard. See Managing your genebank profile and settings for full details.
Step 7: Prepare and upload your first passport data
The final step is publishing your first batch of accession records, detailed in Preparing Passport Data and Module 5: Uploading Passport Data to Genesys.
Minimum data requirements
To register an accession in Genesys, you must provide a minimum set of core information. This ensures that every record is uniquely identifiable and taxonomically valid. The required fields are:
- Accession number (
ACCENUMB) - Genus (
GENUS) - you may use "Unknown" if the genus is not yet available - WIEWS institute code (
INSTCODE) - the unique identifier for your organization assigned by FAO WIEWS
We recommend the "start small, add details later" approach (see Data Curation and Validation). It is better to publish a smaller set of accurate records than to delay publication while attempting to assemble a perfect dataset. Genesys supports incremental enrichment, and the Crop Trust provides validation tools for taxonomic names and geographic coordinates to help improve data quality over time.
After your first upload is published, the Genesys team typically posts an announcement at https://www.genesys-pgr.org/content/news.
-
Do I need a user account on Genesys to be a data provider?
Yes. Data-provider permissions are assigned to individual user accounts. Without an account, the Genesys team cannot assign these permissions. Note that a user account alone does not make you a data provider; the signed DPA in Step 5 is required. -
Can everyone access and download accession data from Genesys?
Yes. Genesys is an open portal. Both registered users and anonymous visitors can search, view, and download accession data, subject to the Terms and Conditions of Use. Registered users have access to additional features, such as "My List" selections for material requests. -
Do I have control over who can see and download data?
No. However, you control which records you publish. You can withhold sensitive records, generalize coordinates for protected locations, or remove personally identifiable information (see What Is Passport Data?). Once published, data is public. -
Once shared, can the data be removed?
Yes. You retain ownership of your data and can update or remove records at any time. To discontinue the publication relationship, you can request data withdrawal, and the Crop Trust will remove it within three calendar months. More commonly, records are updated as the collection changes (e.g., adding accessions, changing status to historical, or enriching descriptive data; see Frequency of Data Updates).
Where to go next
- To understand the Data Provider Agreement in detail, see the The Genesys Data Provider Agreement section.
- If you have the DPA and wish to prepare data, go to the Preparing Passport Data section.
- For additional questions, contact helpdesk@genesys-pgr.org.